WebHelp:Ripping Tracks from CDs/5.0: Difference between revisions
Jump to navigation
Jump to search
mNo edit summary |
mNo edit summary |
||
| Line 13: | Line 13: | ||
=== Rip an Audio CD === | === Rip an Audio CD === | ||
# Insert the Audio CD into your PC. | # Insert the Audio CD into your PC. | ||
# MediaMonkey will lookup the Audio CD based on you settings under '''Tools > Options > Metadata lookup''' from the Main Menu by changing the ''Audio CD metadata lookup'' settings. If multiple matches for your Audio CD are found MediaMonkey will prompt which one you'd like to use.<br>[[File:Wiki-MM5 CD Lookup.jpg| | # MediaMonkey will lookup the Audio CD based on you settings under '''Tools > Options > Metadata lookup''' from the Main Menu by changing the ''Audio CD metadata lookup'' settings. If multiple matches for your Audio CD are found MediaMonkey will prompt which one you'd like to use.<br>[[File:Wiki-MM5 CD Lookup.jpg|800px|center|Audio CD Lookup Confirmation]] | ||
# The Audio CD should appear in the Media tree, but is also available in [[{{WebHelp:Links|My Computer}}|Folders]] node in the Media Tree.<br>[[File:Wiki-MM5 CD Node.jpg| | # The Audio CD should appear in the Media tree, but is also available in [[{{WebHelp:Links|My Computer}}|Folders]] node in the Media Tree.<br>[[File:Wiki-MM5 CD Node.jpg|800px|center|Audio CD shown in MediaMonkey]] | ||
# When you select the CD in the Media Tree you can [[{{WebHelp:Links|Editing Track Properties}}|edit the files tags]] prior to Ripping the Audio CD so that the files are Ripped with the correct metadata as well as folder/filenames. | # When you select the CD in the Media Tree you can [[{{WebHelp:Links|Editing Track Properties}}|edit the files tags]] prior to Ripping the Audio CD so that the files are Ripped with the correct metadata as well as folder/filenames. | ||
# If you want to Rip the Audio CD use '''Tools > Rip Audio CD''' from the Main Menu, Rip Audio CD from the Context menu of the CD node in the Media Tree or Rip Audio CD from the Context menu of selected Track(s) on the Audio CD in the Filelisting. | # If you want to Rip the Audio CD use '''Tools > Rip Audio CD''' from the Main Menu, Rip Audio CD from the Context menu of the CD node in the Media Tree or Rip Audio CD from the Context menu of selected Track(s) on the Audio CD in the Filelisting. | ||
# The Rip CD dialog will appear, from which you may configure:<br> | # The Rip CD dialog will appear, from which you may configure:<br>[[File:Wiki-MM5 CD Rip Dialog.jpg|800px|center|MediaMonkey Audio CD Rip dialog]] | ||
[[File:Wiki-MM5 CD Rip Dialog.jpg| | |||
#* The Directory and Filename format to be used for the new Tracks. Choose the format in which your files will be saved by clicking the 'Configure...' button to choose the location where the files will be saved. See: [[{{WebHelp:Links|Configuring Directory and File Formats}}|Configuring Directory and Filename Formats]] | #* The Directory and Filename format to be used for the new Tracks. Choose the format in which your files will be saved by clicking the 'Configure...' button to choose the location where the files will be saved. See: [[{{WebHelp:Links|Configuring Directory and File Formats}}|Configuring Directory and Filename Formats]] | ||
#* The compression format to be used for ripping the Tracks. See: [[{{WebHelp:Links|Basic Concepts}}|Digital Ripping & Digital File Formats]] | #* The compression format to be used for ripping the Tracks. See: [[{{WebHelp:Links|Basic Concepts}}|Digital Ripping & Digital File Formats]] | ||
Revision as of 21:45, 7 December 2020
Wiki Home > MediaMonkey 5 Help > Adding Media Files & CDs > Ripping Tracks from CDs
MediaMonkey can help you copy your CDs to your PC. This will allow you to play the files without the CD inserted as well as Sync the files to a device or stream them to a UPnP/DLNA client.
MediaMonkey can Rip Audio CDs as well as copy media files from Data CDs. MediaMonkey can't Rip DVDs/BluRays.
Copy a Data CD
- Insert the Data CD into your PC.
- Browse to the CD in the Folders node in the Media Tree.
- Select the files on the CD and then you can copy the files using Copy & Paste or use Auto-Organize Files set to Copy
Rip an Audio CD
- Insert the Audio CD into your PC.
- MediaMonkey will lookup the Audio CD based on you settings under Tools > Options > Metadata lookup from the Main Menu by changing the Audio CD metadata lookup settings. If multiple matches for your Audio CD are found MediaMonkey will prompt which one you'd like to use.
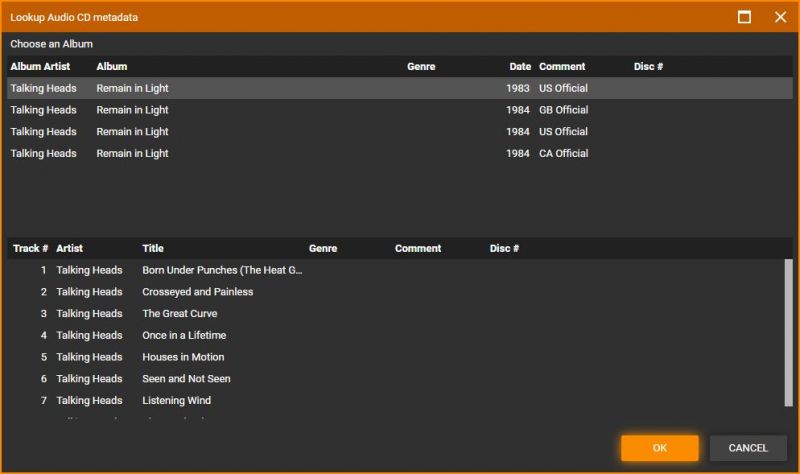
Audio CD Lookup Confirmation - The Audio CD should appear in the Media tree, but is also available in Folders node in the Media Tree.
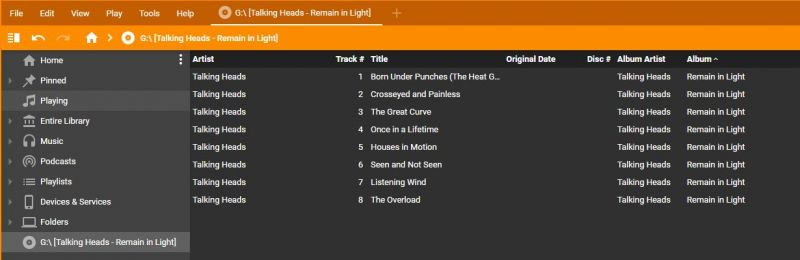
Audio CD shown in MediaMonkey - When you select the CD in the Media Tree you can edit the files tags prior to Ripping the Audio CD so that the files are Ripped with the correct metadata as well as folder/filenames.
- If you want to Rip the Audio CD use Tools > Rip Audio CD from the Main Menu, Rip Audio CD from the Context menu of the CD node in the Media Tree or Rip Audio CD from the Context menu of selected Track(s) on the Audio CD in the Filelisting.
- The Rip CD dialog will appear, from which you may configure:
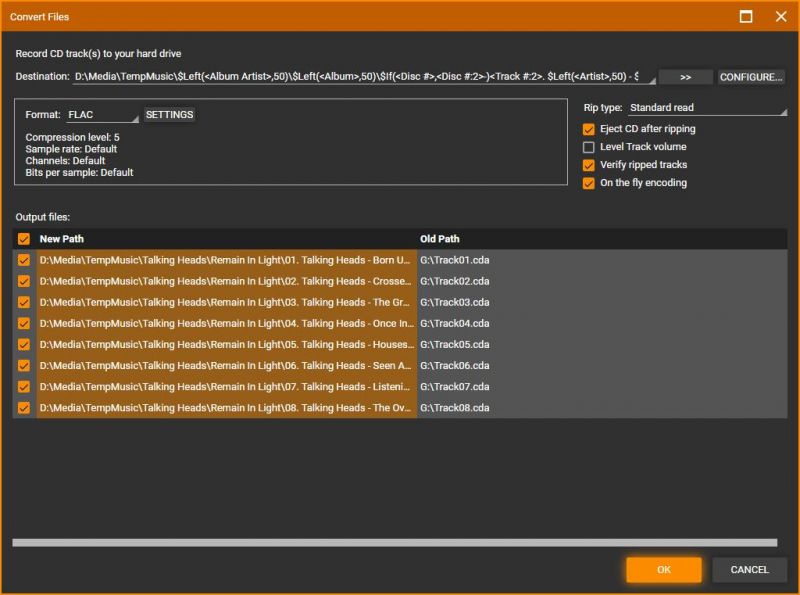
MediaMonkey Audio CD Rip dialog - The Directory and Filename format to be used for the new Tracks. Choose the format in which your files will be saved by clicking the 'Configure...' button to choose the location where the files will be saved. See: Configuring Directory and Filename Formats
- The compression format to be used for ripping the Tracks. See: Digital Ripping & Digital File Formats
- Whether the volume of the Tracks should be leveled as they are encoded. This is slightly different from just analyzing the volume levels, since in addition to performing the analysis, this actually modifies the volume levels of the ripped Track.


- Press 'Ok' to rip selected Tracks.
Once the tracks have been recorded, you'll receive a confirmation that they've been recorded correctly, and you'll be able to access the tracks in your library even after you've removed the CD.
| English |
Additional Help: Knowledge Base | Forum | MediaMonkey Support | MediaMonkey for Android Help | MediaMonkey 5 Help | MediaMonkey 4 Help