WebHelp:Installation: Difference between revisions
mNo edit summary |
mNo edit summary |
||
| (11 intermediate revisions by the same user not shown) | |||
| Line 1: | Line 1: | ||
[[Main Page|Wiki Home]] > [[{{WebHelp:Links|Content}}|MediaMonkey | [[Main Page|Wiki Home]] > [[{{WebHelp:Links|Content}}|MediaMonkey 2024 Help]] > [[{{WebHelp:Links|Getting Started}}|Getting Started]] > Installing MediaMonkey | ||
---- | ---- | ||
| Line 26: | Line 26: | ||
Install Wizard steps: | Install Wizard steps: | ||
<ol> | |||
[[File:Wiki-MM2024 Installer Language Selection.png|center|alt=MediaMonkey Installer Language Selection|MediaMonkey Installer Language Selection]]<br><br> | <li>'''Select setup language''', after starting installation the first window will ask what language should be used during installation.[[File:Wiki-MM2024 Installer Language Selection.png|center|alt=MediaMonkey Installer Language Selection|MediaMonkey Installer Language Selection]]<br><br></li> | ||
<li>'''Welcome''', the next window will welcome you to the Setup Wizard.[[File:Wiki-MM2024 Installer Wizard Start.png|center|alt=MediaMonkey Installer Wizard Start|MediaMonkey Installer Wizard Start]]<br><br></li> | |||
<li>'''Destination Folder''', allows you to choose to do a ''Portable Install'' instead of a regular install and define in which folder MediaMonkey should be installed. | |||
<ul><li>It is not recommended to do a Portable Install in the Program Files folder due to Windows restrictions on this folder.<br><br> | |||
<br><div style="margin-left: auto; margin-right: auto; background-color:#cceeff; border:2px solid #002233; padding:10px; width: 70%; font-size:100%; text-align:left; vertical-align:center"> | <div style="margin-left: auto; margin-right: auto; background-color:#cceeff; border:2px solid #002233; padding:10px; width: 70%; font-size:100%; text-align:left; vertical-align:center"> | ||
{| style="width:100%;background:none;" | {| style="width:100%;background:none;" | ||
| style="width:60px;padding:.3em;" |[[Image:Information_sign_(60px).png|60px]] | | style="width:60px;padding:.3em;" |[[Image:Information_sign_(60px).png|60px]] | ||
| ''Portable Install'' is an installation in which all files associated MediaMonkey (the app, registry & settings, database, addons, temp & cache folders, and podcasts) reside in the folder where MediaMonkey is installed. The benefit is that such an installation can be made to external/USB storage devices and can be used on multiple computers (especially if media files are also stored to the device). Portable installs are also helpful for testing multiple versions of an app without affecting other installed versions. | | '''Portable Install''' is an installation in which all files associated MediaMonkey (the app, registry & settings, database, addons, temp & cache folders, and podcasts) reside in the folder where MediaMonkey is installed. The benefit is that such an installation can be made to external/USB storage devices and can be used on multiple computers (especially if media files are also stored to the device). Portable installs are also helpful for testing multiple versions of an app without affecting other installed versions. A Portable Install will also not create shortcuts in the Start Menu, thus needs to be launched by launching MediaMonkey.exe from the location where the portable install was installed. | ||
|}</div><br> | |}</div><br><br>[[File:Wiki-MM2024 Installer Install Location.png|center|alt=MediaMonkey Installer Install Location|MediaMonkey Installer Install Location]]<br><br></li></ul></li> | ||
''[[File:Wiki- | <li>'''License Agreement''' is shown and needs to be agreed to.[[File:Wiki-MM2024 Installer License Agreement.png|center|alt=MediaMonkey Installer License Agreement|MediaMonkey Installer License Agreement]]<br><br></li> | ||
<li>'''Additional Tasks''' allows you to have MediaMonkey create a desktop shortcut to MediaMonkey ''(this is not shown when doing a Portable Install)''.[[File:Wiki-MM2024 Installer Additional Tasks.png|center|alt=MediaMonkey Installer Additional Tasks|MediaMonkey Installer Additional Tasks]]<br><br></li> | |||
<li>'''Ready to install''' will shows you the selections made in the installer.[[File:Wiki-MM2024 Installer Ready to Install.png|center|alt=MediaMonkey Installer Ready to Install|MediaMonkey Installer Ready to Install]]<br><br></li> | |||
<li>'''Installing''', will show you the installation progress.</li> | |||
<li>'''Completing the Setup Wizard''', will allow you to launch MediaMonkey.[[File:Wiki-MM2024 Installer Complete.png|center|alt=MediaMonkey Installer Complete|MediaMonkey Installer Complete]]</li> | |||
</ol> | |||
== MediaMonkey Initial Setup Wizard == | == MediaMonkey Initial Setup Wizard == | ||
| Line 45: | Line 49: | ||
Setup Wizard steps: | Setup Wizard steps: | ||
#'''Welcome to MediaMonkey''', the first screen welcomes allows you to select which locations should be [[{{WebHelp:Links|Adding_Existing_Files_to_the_Library}}|scanned]]. You may want to skip initial scanning if you want to change the [[{{WebHelp:Links|Adding_Existing_Files_to_the_Library}}#Setup_how_MediaMonkey_Scans_Files|settings]] used for scanning first. Make sure to read the Help on [[{{WebHelp:Links|Adding_Existing_Files_to_the_Library}}|scanning files]] before scanning. Scanning can be done at any time using '''File > [[{{WebHelp:Links|Adding_Existing_Files_to_the_Library}}|Add/Rescan Files to the Library]]''' from the Main Menu.[[File:Wiki- | #'''Welcome to MediaMonkey''', the first screen welcomes allows you to select which locations should be [[{{WebHelp:Links|Adding_Existing_Files_to_the_Library}}|scanned]]. You may want to skip initial scanning if you want to change the [[{{WebHelp:Links|Adding_Existing_Files_to_the_Library}}#Setup_how_MediaMonkey_Scans_Files|settings]] used for scanning first. Make sure to read the Help on [[{{WebHelp:Links|Adding_Existing_Files_to_the_Library}}|scanning files]] before scanning. Scanning can be done at any time using '''File > [[{{WebHelp:Links|Adding_Existing_Files_to_the_Library}}|Add/Rescan Files to the Library]]''' from the Main Menu.[[File:Wiki-MM2024 First Run Setup Wizard Scanning.png|center|alt=MediaMonkey First Run Setup Wizard Scanning|MediaMonkey First Run Setup Wizard Scanning]]<br><br> | ||
#'''[[{{WebHelp:Links|Setting_UPnP_DLNA_Media_Servers}}|Share Media]]''' which enables the sharing of your MediaMonkey Library to DLNA capable devices on your local network. Media Sharing is also needed to be able to [[{{WebHelp:Links|Sync_MediaMonkey_with_an_Android_device}}#Wi-Fi Sync|Wifi Sync]] to [[MediaMonkey for Android|MediaMonkey for Android]].[[File:Wiki- | #'''[[{{WebHelp:Links|Setting_UPnP_DLNA_Media_Servers}}|Share Media]]''' which enables the sharing of your MediaMonkey Library to DLNA capable devices on your local network. Media Sharing is also needed to be able to [[{{WebHelp:Links|Sync_MediaMonkey_with_an_Android_device}}#Wi-Fi Sync|Wifi Sync]] to [[MediaMonkey for Android|MediaMonkey for Android]].[[File:Wiki-MM2024 First Run Share Media.png|center|alt=MediaMonkey First Run Share Media|MediaMonkey First Run Share Media]]<br><br> | ||
#'''[[{{WebHelp:Links|Upgrading_to_the_Gold_Version}}#Registering_your_License|Registration]]''', allows you to enter your [[{{WebHelp:Links|Upgrading_to_the_Gold_Version}}|MediaMonkey Gold License Key]] if you purchased a License. | #'''[[{{WebHelp:Links|Upgrading_to_the_Gold_Version}}#Registering_your_License|Registration]]''', allows you to enter your [[{{WebHelp:Links|Upgrading_to_the_Gold_Version}}|MediaMonkey Gold License Key]] if you purchased a License.[[File:Wiki-MM2024 First Run Registration.png|center|alt=MediaMonkey First Run Registration|MediaMonkey First Run Registration]]<br><br> | ||
[[File:Wiki- | #Select '''Done''' to finish the Setup Wizard.[[File:Wiki-MM2024 First Run.png|center|alt=MediaMonkey First Run|MediaMonkey First Run]]<br><br> | ||
#Select '''Done''' to finish the Setup Wizard. | |||
=== Additional dialogs === | |||
MediaMonkey may show the following additional dialogs during setup: | |||
* When you enable the Media Server you may see a Windows Defender or other Firewall message asking permissions for MediaMonkey to communicate on the network. This is required for [[WebHelp:Setting_UPnP_DLNA_Media_Servers|MediaMonkey Media Server]] to work. In most cases it's best to only allow this for private networks.[[File:Wiki-MM2024 First Run Windows Defender.png|center|alt=MediaMonkey First Run Windows Defender|MediaMonkey First Run Windows Defender]]<br><br> | |||
*If you have [https://www.mediamonkey.com/forum/viewforum.php?f=31 MediaMonkey Server] running you'll be shown a Migration Wizard.[[File:Wiki-MM5 First Run Migration Wizard.jpg|566px|center|First Run Migration Wizard]] | |||
| Line 58: | Line 65: | ||
To update your MediaMonkey install [https://www.mediamonkey.com/support/knowledge-base/mediamonkey-general/download-mediamonkey/ download] MediaMonkey and install it in the same location you want to update. Your settings and library will be maintained during an upgrade. | To update your MediaMonkey install [https://www.mediamonkey.com/support/knowledge-base/mediamonkey-general/download-mediamonkey/ download] MediaMonkey and install it in the same location you want to update. Your settings and library will be maintained during an upgrade. | ||
=== MediaMonkey | === MediaMonkey 2024 Updates === | ||
* To upgrade your MediaMonkey 5 installation simply [https://www.mediamonkey.com/support/knowledge-base/mediamonkey-general/download-mediamonkey/ download] the new version and install it on top of the existing MediaMonkey 5 installation. | * To upgrade your MediaMonkey 2024 or MediaMonkey 5 installation simply [https://www.mediamonkey.com/support/knowledge-base/mediamonkey-general/download-mediamonkey/ download] the new version and install it on top of the existing MediaMonkey 2024 or MediaMonkey 5 installation. | ||
** Close MediaMonkey before installing the update. | ** Close MediaMonkey before installing the update. | ||
** Make sure you install a regular install on top of a regular install and a Portable install on top of a Portable install. | ** Make sure you install a regular install on top of a regular install and a Portable install on top of a Portable install. | ||
** If you want to be notified of new MediaMonkey releases you can enable ''Check for updates'' under '''Tools > Options > General''' from the Main Menu. You can also include notifications for beta builds if you're interested to help test MediaMonkey. | ** If you want to be notified of new MediaMonkey releases you can enable ''Check for updates'' under '''Tools > Options > General''' from the Main Menu. You can also include notifications for beta builds if you're interested to help test MediaMonkey. | ||
=== MediaMonkey 4 to MediaMonkey | === MediaMonkey 4 to MediaMonkey 2024 Update === | ||
* MediaMonkey | * MediaMonkey 2024 by default will install in the ''MediaMonkey 5'' folder in Program Files instead of the ''MediaMonkey'' folder used by MediaMonkey versions before MediaMonkey 2024. This means that your MediaMonkey 4 install is still installed after updating to MediaMonkey 2024. You can [https://www.mediamonkey.com/support/knowledge-base/mediamonkey-install-config/how-to-completely-uninstall-mediamonkey/ uninstall MediaMonkey 4] if you wish to do so after updating to MediaMonkey 2024. | ||
* Updating from MediaMonkey 4 to MediaMonkey | * Updating from MediaMonkey 4 to MediaMonkey 2024 will create a new copy ''(MM5.DB)'' of the MediaMonkey 4 database that will be used by MediaMonkey 2024. This means that your MediaMonkey 4 database is still available. | ||
** MediaMonkey will offer to update the [https://www.mediamonkey.com/support/knowledge-base/purchasing-licensing-mediamonkey-for-windows/upgrade-mediamonkey-for-windows/ MediaMonkey 4 database] from any MediaMonkey 4 regular installs found on your PC ''(for MediaMonkey 4 Portable Installs only if there is a shortcut to the MediaMonkey.exe from the MediaMonkey 4 install on your desktop)''. | ** MediaMonkey will offer to update the [https://www.mediamonkey.com/support/knowledge-base/purchasing-licensing-mediamonkey-for-windows/upgrade-mediamonkey-for-windows/ MediaMonkey 4 database] from any MediaMonkey 4 regular installs found on your PC ''(for MediaMonkey 4 Portable Installs only if there is a shortcut to the MediaMonkey.exe from the MediaMonkey 4 install on your desktop)''. | ||
** If MediaMonkey | ** If MediaMonkey 2024 did not use your MediaMonkey 4 database, close MediaMonkey and then copy the MediaMonkey 4 database file (MM.db) to the MediaMonkey 2024 [https://www.mediamonkey.com/support/knowledge-base/mediamonkey-install-config/modifying-the-mediamonkey-db-and-ini-files/ database location] and rename the existing MediaMonkey 2024 database from MM5.db to MM5.db.bak. When starting MediaMonkey 2024 it will update the MediaMonkey 4 database to a MediaMonkey 2024 database. | ||
* MediaMonkey 4 and older Licenses are not valid for MediaMonkey | * MediaMonkey 4 and older Licenses are not valid for MediaMonkey 2024, thus Gold functionality will be lost. Lifetime License holders can [https://www.mediamonkey.com/support/knowledge-base/purchasing-licensing-mediamonkey-for-windows/retrieve-a-lost-license-key/ use their License] with MediaMonkey 2024. | ||
* See [[{{WebHelp:Links|What's New}}|What's New in MediaMonkey]] | * See [[{{WebHelp:Links|What's New}}|What's New in MediaMonkey]] | ||
Latest revision as of 01:55, 5 September 2024
Wiki Home > MediaMonkey 2024 Help > Getting Started > Installing MediaMonkey
Introduction
This will explain how to install MediaMonkey on your PC. It applies to both the regular as well as portable install of MediaMonkey. If you are trying to move MediaMonkey to a new PC please see this guide too.
Downloading
You can always download the latest version of MediaMonkey from the Download page. The download is the same for both Gold License and Free version users. Entering your License will unlock the Gold features.
- Latest stable release: Download Page
- Latest beta release (when available): Beta Forum
- Debug version: Download and debug instructions
- Old versions: KnowledgeBase
Installing
After downloading MediaMonkey double click on the downloaded installer to start the install process. This process is the same for a first time install or for installing an upgrade.
Install Wizard steps:
- Select setup language, after starting installation the first window will ask what language should be used during installation.

MediaMonkey Installer Language Selection - Welcome, the next window will welcome you to the Setup Wizard.

MediaMonkey Installer Wizard Start - Destination Folder, allows you to choose to do a Portable Install instead of a regular install and define in which folder MediaMonkey should be installed.
- It is not recommended to do a Portable Install in the Program Files folder due to Windows restrictions on this folder.
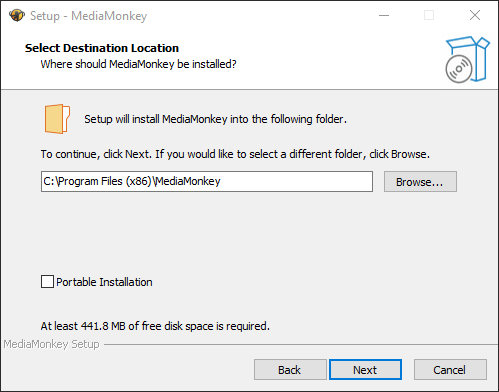
MediaMonkey Installer Install Location
- It is not recommended to do a Portable Install in the Program Files folder due to Windows restrictions on this folder.
- License Agreement is shown and needs to be agreed to.

MediaMonkey Installer License Agreement - Additional Tasks allows you to have MediaMonkey create a desktop shortcut to MediaMonkey (this is not shown when doing a Portable Install).
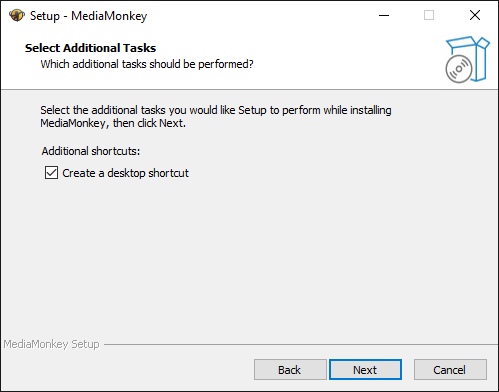
MediaMonkey Installer Additional Tasks - Ready to install will shows you the selections made in the installer.
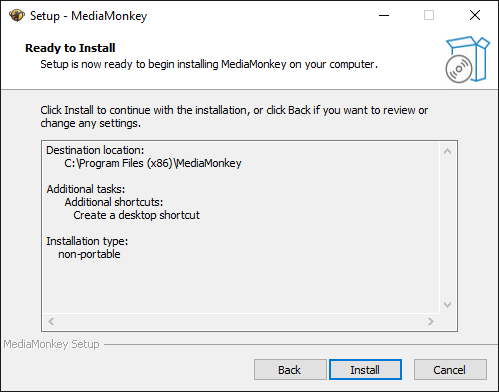
MediaMonkey Installer Ready to Install - Installing, will show you the installation progress.
- Completing the Setup Wizard, will allow you to launch MediaMonkey.

MediaMonkey Installer Complete
MediaMonkey Initial Setup Wizard
Running MediaMonkey for the first time will show you the Initial Setup Wizard, which will allow you to register your License, set file associations and scan your PC for Media Files. Any of the settings set in the Initial Setup Wizard can be accessed in MediaMonkey itself at any time.
Setup Wizard steps:
- Welcome to MediaMonkey, the first screen welcomes allows you to select which locations should be scanned. You may want to skip initial scanning if you want to change the settings used for scanning first. Make sure to read the Help on scanning files before scanning. Scanning can be done at any time using File > Add/Rescan Files to the Library from the Main Menu.
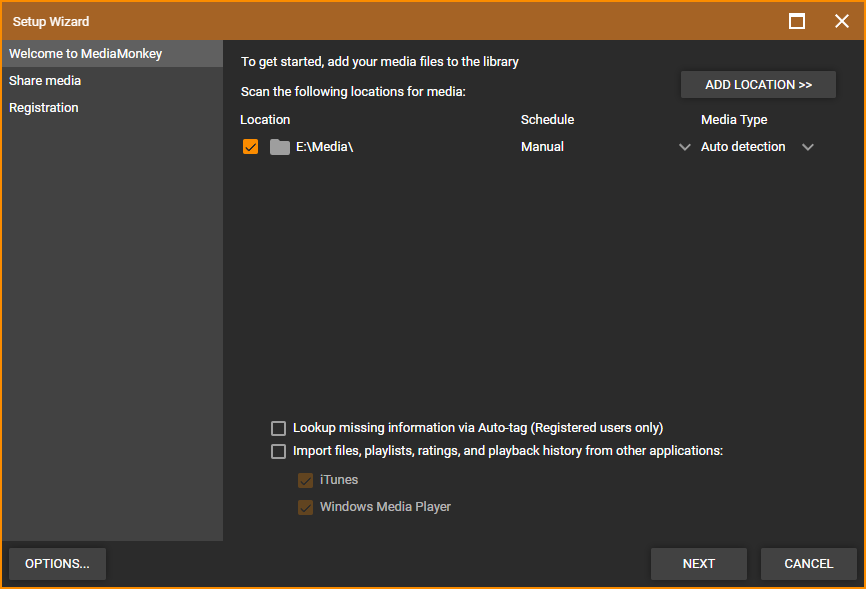
MediaMonkey First Run Setup Wizard Scanning - Share Media which enables the sharing of your MediaMonkey Library to DLNA capable devices on your local network. Media Sharing is also needed to be able to Wifi Sync to MediaMonkey for Android.
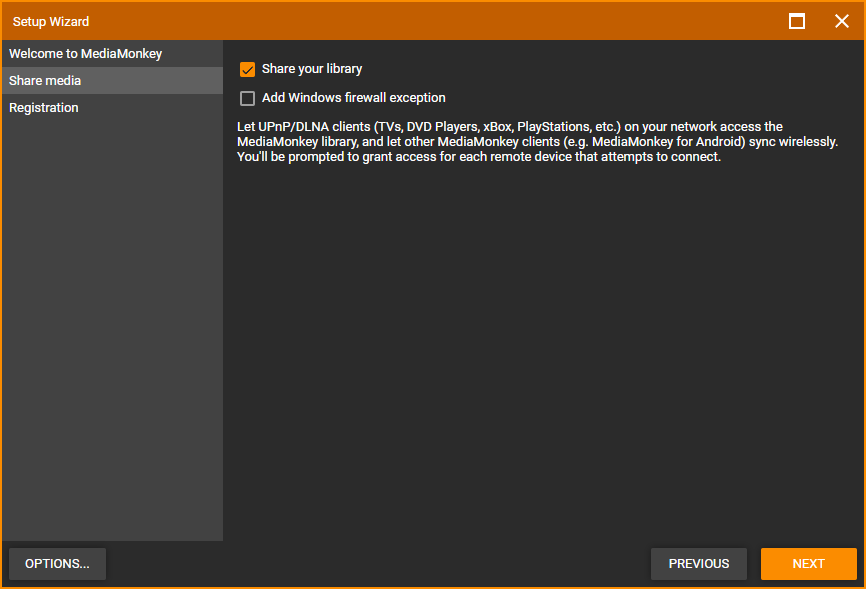
MediaMonkey First Run Share Media - Registration, allows you to enter your MediaMonkey Gold License Key if you purchased a License.

MediaMonkey First Run Registration - Select Done to finish the Setup Wizard.

MediaMonkey First Run
Additional dialogs
MediaMonkey may show the following additional dialogs during setup:
- When you enable the Media Server you may see a Windows Defender or other Firewall message asking permissions for MediaMonkey to communicate on the network. This is required for MediaMonkey Media Server to work. In most cases it's best to only allow this for private networks.
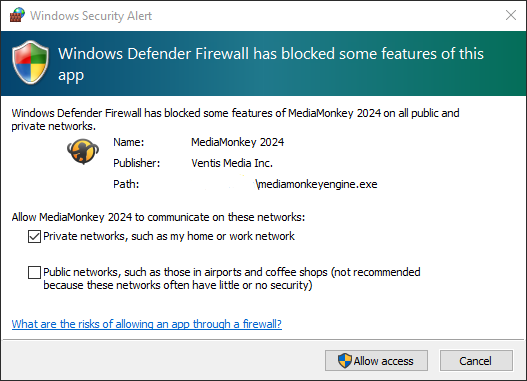
MediaMonkey First Run Windows Defender - If you have MediaMonkey Server running you'll be shown a Migration Wizard.
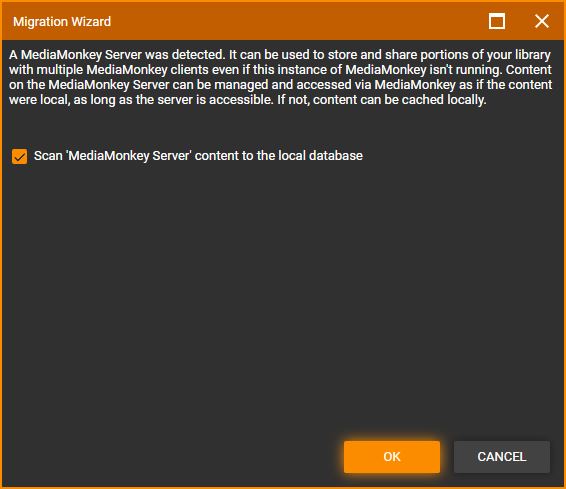
First Run Migration Wizard
Updating MediaMonkey
To update your MediaMonkey install download MediaMonkey and install it in the same location you want to update. Your settings and library will be maintained during an upgrade.
MediaMonkey 2024 Updates
- To upgrade your MediaMonkey 2024 or MediaMonkey 5 installation simply download the new version and install it on top of the existing MediaMonkey 2024 or MediaMonkey 5 installation.
- Close MediaMonkey before installing the update.
- Make sure you install a regular install on top of a regular install and a Portable install on top of a Portable install.
- If you want to be notified of new MediaMonkey releases you can enable Check for updates under Tools > Options > General from the Main Menu. You can also include notifications for beta builds if you're interested to help test MediaMonkey.
MediaMonkey 4 to MediaMonkey 2024 Update
- MediaMonkey 2024 by default will install in the MediaMonkey 5 folder in Program Files instead of the MediaMonkey folder used by MediaMonkey versions before MediaMonkey 2024. This means that your MediaMonkey 4 install is still installed after updating to MediaMonkey 2024. You can uninstall MediaMonkey 4 if you wish to do so after updating to MediaMonkey 2024.
- Updating from MediaMonkey 4 to MediaMonkey 2024 will create a new copy (MM5.DB) of the MediaMonkey 4 database that will be used by MediaMonkey 2024. This means that your MediaMonkey 4 database is still available.
- MediaMonkey will offer to update the MediaMonkey 4 database from any MediaMonkey 4 regular installs found on your PC (for MediaMonkey 4 Portable Installs only if there is a shortcut to the MediaMonkey.exe from the MediaMonkey 4 install on your desktop).
- If MediaMonkey 2024 did not use your MediaMonkey 4 database, close MediaMonkey and then copy the MediaMonkey 4 database file (MM.db) to the MediaMonkey 2024 database location and rename the existing MediaMonkey 2024 database from MM5.db to MM5.db.bak. When starting MediaMonkey 2024 it will update the MediaMonkey 4 database to a MediaMonkey 2024 database.
- MediaMonkey 4 and older Licenses are not valid for MediaMonkey 2024, thus Gold functionality will be lost. Lifetime License holders can use their License with MediaMonkey 2024.
- See What's New in MediaMonkey
Uninstall MediaMonkey
MediaMonkey can be uninstalled through the Windows Control Panel. This will uninstall MediaMonkey from your system, but will leave some MediaMonkey user files like the database on your system. You can remove those by doing a full uninstall. Portable Installs of MediaMonkey can be uninstalled by deleting the folder where the Portable Install is installed.
Notes
- You can subscribe to the MediaMonkey newsletter to be informed when a new release becomes available.
- The debug version of MediaMonkey can be installed right over the existing installation and be run the same way.
- If you receive errors during installation that a file can't be replaced or a Code 5 error it is recommended to restart the PC and then start the installation of MediaMonkey again.
- For the location of the database and settings files see KnowledgeBase.
- If you forgot your License information see KnowledgeBase.
Related
- What's New in MediaMonkey
- Adding Existing Files to the Library
- Customizing MediaMonkey
- MediaMonkey Gold License Key
- Knowledge Base: Clean Install
- Moving MediaMonkey to a New Computer
Previous: Getting Started
Next: Adding Existing Files to the Library
| English |
Additional Help: Knowledge Base | Forum | MediaMonkey Support | MediaMonkey for Android Help | MediaMonkey 5 Help | MediaMonkey 4 Help
