WebHelp:Adding Existing Files to the Library/4.0/es: Difference between revisions
| Line 27: | Line 27: | ||
Además puede definir otras opciones como qué tipos de archivos a analizarse. Una vez que pulse el botón'' 'Aceptar' el'', MediaMonkey explorará las ubicaciones seleccionadas para los tipos de Archivos Multimedia que ha elegido, y: | Además puede definir otras opciones como qué tipos de archivos a analizarse. Una vez que pulse el botón'' 'Aceptar' el'', MediaMonkey explorará las ubicaciones seleccionadas para los tipos de Archivos Multimedia que ha elegido, y: | ||
* | *Agregará cualquier Archivo Multimedia nuevo y asociará el Arte (de archivos o etiquetas) al Catálogo. | ||
*[[WebHelp:Adding CDs to the Library/4.0|Catalog the contents of any CDs]] that are found to the Library. CDs that have been added to the Library will appear in the [[WebHelp:Library/4.0#Location|Location]] node of the matching [[WebHelp:Playback Rules/4.0#Collections|Collection]]. If any CD is selected to be scanned, the Files on the CD will appear greyed out if the CD is not inserted, and in black if the CD is inserted. | *[[WebHelp:Adding CDs to the Library/4.0|Catalog the contents of any CDs]] that are found to the Library. CDs that have been added to the Library will appear in the [[WebHelp:Library/4.0#Location|Location]] node of the matching [[WebHelp:Playback Rules/4.0#Collections|Collection]]. If any CD is selected to be scanned, the Files on the CD will appear greyed out if the CD is not inserted, and in black if the CD is inserted. | ||
Revision as of 19:27, 22 March 2013
Help > Getting Started > Agregar archivos existentes al Catálogo
Agregar archivos Multimedia al catálogo le permitirá crear Listas de Reproducción y AutoListas de Reproducción así como realizar un seguimiento del número de reproducciones. Usted puece acceder a los archivos Multimedia no en el catálogo a través del nodo Mi Ordenador, pero las reproducciones no serán recordadas por este nodo.
Búsqueda manual de Archivos en el Catálogo
Para gestionar sus archivos Multimedia deberá agregarlos al Catálogo. Esto se realiza automáticamente la primera vez que ejecuta la aplicación. Subsecuentemente usted podrá realizar este proceso manualmente:
- Seleccione Archivos > Añadir/Reexaminar archivos al Catálogo en el menú principal, o presione <Insertar>.
- Elija la qué Unidad, Carpeta o Ubicación de Red que desee agregar.
- Si usted desea introducir una ruta de red, teclee la ruta que desea escanear entre comillas y use el botón Agregar.
- Utilice el botón Tipos de Archivo para seleccionar qué Archivos Multimedia agregará a su Catálogo.
- Use el botón Opciones para cambiar las opciones que afectan la examinación de archivos.
- Habilite Ocultar items no seleccionados para mostrar solamente carpetas seleccionadas para ser examinadas.
- Cuando los archivos son añadidos por primera vez al Catálogo de MediaMonkey automaticamente ajustará el tipo y colocará el archivo en la Colección respectiva como Música, Clásica, Música o Videos. Todos los archivos serán visibles en el catálogo completo de la Colección.

Además puede definir otras opciones como qué tipos de archivos a analizarse. Una vez que pulse el botón 'Aceptar' el, MediaMonkey explorará las ubicaciones seleccionadas para los tipos de Archivos Multimedia que ha elegido, y:
- Agregará cualquier Archivo Multimedia nuevo y asociará el Arte (de archivos o etiquetas) al Catálogo.
- Catalog the contents of any CDs that are found to the Library. CDs that have been added to the Library will appear in the Location node of the matching Collection. If any CD is selected to be scanned, the Files on the CD will appear greyed out if the CD is not inserted, and in black if the CD is inserted.
- Add any .m3u Playlists that are found to the Library, along with any of the Media Files contained within the Playlists (if they can be found in the path stored in the M3U file).
- Notify you of any Media Files that are missing from the scanned location and give you the option to remove them from the Library or find them using Locate Moved/Missing files.

The Remove Unavailable Files dialog window

- Update the properties of any scanned media files that have changed (configurable, by default, only Tracks whose file size or timestamps has changed are updated).
- Give you the option of importing missing ratings, play count, and last played data associated with the media files from a Windows Media Player, iTunes or Winamp database, if one resides on your computer.

The Import Data dialog window

- Give you the results of the scan.

The Scan Results dialog window

Using Folder Monitoring to Automatically Update the Library
The Add/Rescan files to the Library dialog also allows you to monitor selected folders for any changes to Media Files so that the library is automatically updated. To do so select a folder in the left hand side and under and under Folder Monitoring you can:
- Select Scan continuously for any Folder to update the Library if changes occur while MediaMonkey is running.
- Select Scan at startup for any Folder to check for changes and update the Library for changes that occur when MediaMonkey isn't running.
In addition to updating the library for added/changed Media Files, this will:
- Automatically remove any Media Files that have been deleted (enable/disable under Tools > Options > Library on the main menu with the Remove unavailable items option.)
- Automatically change the location of any Media Files that have been moved.
If you're planning to move files outside of MediaMonkey either manually in Windows Explorer or by using another application you should enable the Scan continuously option on both the source and destination folder and leave MediaMonkey running while you're making the changes. This way the MediaMonkey Library remains up to date with the new file locations. However you should check out the build in methods for moving files as there are automated tools to do so.
Manually Adding Individual Media Files
You can manually add individual Media Files to the Library without having to rescan folders by:
- Dragging & dropping them on the main Collection nodes in the MediaMonkey Media Tree from Windows Explorer.
- Dragging & dropping them into the Now Playing and from the Now Playing dragging & dropping them onto a Playlist (not AutoPlaylists.)
Manually Locate Moved/Missing Files
If Media Files have been moved by another application to a new location, MediaMonkey will automatically find the Media File when the File Monitor is configured to monitor the directory to which the media file has been moved. For other cases:
- Go to Collection > Files to Edit > Dead Links in the MediaMonkey Media Tree. You will see a list of Media Files that are inaccessible because they have either been moved or deleted.
- Select the Media File(s) you want to find, and select File > Locate Moved/Missing files on the main menu.
- Choose which drives you would like to scan for the Media File(s).
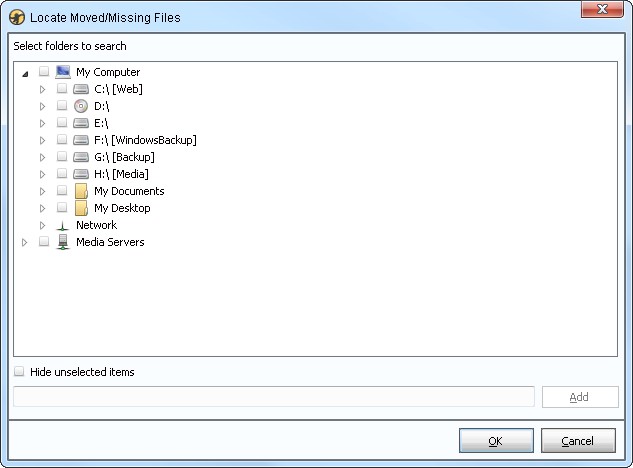
Locate Moved/Missing files dialog - A dialog will appear showing moved files that have been found, files that haven't been moved, and files that couldn't be found. Of those that have been found, select the check box next to them to confirm that you want to update the library with the location indicated.
- The Files Located in New Locations tab shows all files that were moved and have been found in a new location by Locate Moved/Missing Files. Enable Update selected files in the database if you want to update the paths on selected files in the database with the new locations found.
- The Unmoved files tab shows all files that are still accessible in the location stored in the Library.
- The Unlocatable files tab shows all files that were moved, but can't be found by MediaMonkey in the scanned locations. Enable Remove selected files from the database if you want to remove the selected files that couldn't be located from your Library.


Notes
- If you wish to interrupt the file scanning process at any time, simply right-click on the status bar near the bottom of the screen, and click Terminate. If you wish to reduce the amount of CPU cycles used during the process, you may similarly right-click on the status bar, select Change Priority, and choose a lower priority level.
- Although the File Monitor does monitor for moved files, it only searches the specified directories for the moved file, and consequently will not detect the location of the moved file if it has been moved to an unmonitored directory. For these situations, you can use Locate Moved/Missing files.
- Locate Moved/Missing Files finds files based on Filesize and Timestamps or track metadata (Length, Artist, Album and Title).
- If you have Media Files located on drives A or B you'll need to remove the used drive letter(s) from IgnoreDriveLetters=AB in the MediaMonkey.ini[1] file (make sure MediaMonkey is closed when editing MediaMonkey.ini[2].)
- If you have music stored in network locations it is preferred that you use the UNC Path (\\PCName\MusicFolder) instead of using Mapped Drives.
- Did not import xx files (did not match import criteria) will show a count of all files found in the scanned folder not matching the enabled File Types. This includes non Media Files like Office documents and application files, but also all Media Files not enabled under File Types.
- The File Types setting in the Add/Rescan files to the Library dialog selects which types of files should be added to the Library. The File Types under Tools > Options > OS Integration selects for which File Types MediaMonkey will be set as default program to open them with.
- Only dragging & dropping on the main Collection nodes will add files to the Library. This is because other nodes like Album are meant to tag the file and thus MediaMonkey protects against inadvertent tagging by disabling drag & drop from outside of MediaMonkey on those nodes.
- Files located on drives no longer connected will not be listed in the Dead Links node.
- Art stored as files is only added on scanning when only Media Files belonging to the same Album/Series are stored in the folder with the Art and the option to Scan file directories for Artwork is enabled under Tools > Options > Library.
- To add Media Files from UPnP Media Servers select the Media Server in the MediaMonkey Media Tree and select File > Add/Rescan files to the Library on the main menu, or press <Insert>.
- To re-enable the Import Data dialog after scanning set ConfirmImportRatings to ConfirmImportRatings=1 in the MediaMonkey.ini[3] file (make sure MediaMonkey is closed when editing MediaMonkey.ini[4].)
- To re-enable the Scan Results dialog after scanning set ConfirmScanResults to ConfirmScanResults=1 in the MediaMonkey.ini[5] file (make sure MediaMonkey is closed when editing MediaMonkey.ini[6].)
- An Locate Moved/Missing Files alternative is the Update Location of Files in Database addon [7] or the DriveID addon [8].
Related Information
Ripping Tracks from CDs
Ripping Tracks and Cataloguing CDs
Adding CDs to the Library
Next: Browse the Library
| English • Deutsch • español • français |
Additional Help: Knowledge Base | Forum | MediaMonkey Support | MediaMonkey for Android Help | MediaMonkey 5 Help | MediaMonkey 4 Help