WebHelp:Player: Difference between revisions
mNo edit summary |
mNo edit summary |
||
| Line 83: | Line 83: | ||
Under '''File > Options > Layout > Playback rules''' you can enable/disable Adjust speed per [[WebHelp:Playback_Rules#Types|Type]]. | Under '''File > Options > Layout > Playback rules''' you can enable/disable Adjust speed per [[WebHelp:Playback_Rules#Types|Type]]. | ||
== Pop-up Display == | |||
Each time the Player changes playback to a new file, MediaMonkey can show a Pop-up with the new file information. This can be enabled/disabled under '''Tools > Options > Player''' from the Main Menu. The Pop-up has additional settings: [[File:Wiki-MM2024 Options Player Pop-up Display.png|center|alt=MediaMonkey Options Player Pop-up Display|MediaMonkey Options Player Pop-up Display]]<br><br> | |||
* ''Pop-up file info'' If the Pop-up is shown and for how many seconds it should be shown. | |||
* ''Slow fade-out'' determines if and how long the Pop-up should fade out. | |||
* ''Only when inactive'' will only show the Pop-up when MediaMonkey isn't the active window. | |||
* ''Transparency'' controls how transparent the Pop-up will be. A preview will be shown when adjusting this setting. | |||
* ''Location'' controls where on the screen the Pop-up will be shown. A preview will be shown when adjusting this setting. | |||
== The Play & Skip Counter/Bookmarking == | |||
Under '''Tools > Options > [[{{WebHelp:Links|Playback Rules}}|Playback Rules]]''' from the Main Menu you can set per [[{{WebHelp:Links|Playback Rules}}#Types|Media Type]] how much of a file needs to be played before the '''Play counter''' is updated using ''Increase play counter at'' setting.<br> | |||
The '''Skip counter''' is updated by 1 when a file is skipped that played over 2 seconds, but with less than 30% of the file played. | |||
'''Bookmarking''' can be enabled/disabled per [[{{WebHelp:Links|Playback Rules}}#Types|Media Type]] under '''Tools > Options > [[{{WebHelp:Links|Playback Rules}}|Playback Rules]]''' from the Main Menu.[[File:Wiki-MM2024 Options Playback Rules, Play counter.png|center|alt=MediaMonkey Options Playback Rules|MediaMonkey Options Playback Rules]] | |||
Revision as of 17:33, 31 July 2024
Wiki Home > MediaMonkey 2024 Help > Playing Media Files > Player
Introduction
The MediaMonkey Player has 3 different modes which can be switched from using Player Type button.
- The Standard player. This appears within the main MediaMonkey window and has the most functionality.
- The MiniPlayer. This smaller version of the Player has reduced functionality and is optimally used for loading ready-made playlists. The MiniPlayer stays on top of other applications. Using the Playlist icon you can show/hide the Playing window.

- The MicroPlayer. This version of the Player sits next to the system tray as a toolbar in the Windows Taskbar and offers only very basic functions for when playlists have already been loaded, or the Auto-DJ is set. (The MicroPlayer is not available for Portable Installs).
Note: to enable the MicroPlayer to be displayed, you must Right-Click on the Windows Taskbar, and enable Toolbars > MediaMonkey Player.
Open Files
You can open specific files and URL's using File > Open URL or File from the Main Menu to select a specific file on your PC or to use the URL of a specific internet stream. This will not add the file or stream to the MediaMonkey Library.

Shuffle Mode
Enabling Shuffle causes all of the Files in the Playing queue to be played in random order. This can be enabled/disabled via Play > Shuffle from the Main Menu. Shuffle will randomize the order of files in the 'Playing' list.
Repeat Mode
MediaMonkey features two Repeat options available from Play > Repeat in the Main Menu. You can have it Repeat All or Repeat One. Repeat All will repeat all the files in the Playing queue whereas Repeat One will keep repeating the same file. Setting Repeat to Off will stop Repeat. Enabling Repeat will stop Auto-DJ from adding files unless a file near the end of the Playing queue is played per Auto-DJ settings.
Stopping Playback
MediaMonkey has 3 Stop methods available:
- Play > Stop from the Main Menu will immediately Stop playback
- Play > Stop after > Current file from the Main Menu will stop playback after the current playing file is finished.
- Play > Stop after > Every file from the Main Menu will stop playback after every file automatically.
- Using Play > Stop after > Off from the Main Menu either stop after method can be disabled again.
Auto-DJ
Enabling the Auto-DJ causes Files to automatically be added to the 'Playing' queue as it nears the end of the queue, depending on the settings for Auto-DJ.
Visualization
If you wish to view a visual effect synchronized to the beat of the music enable View > Visualization from the Main Menu. Visualizations are shown in the Preview window and it needs to be enabled to be able to enable the Visualization from Play in the Main Menu. Right click on the Visualization and from the Context Menu you can:
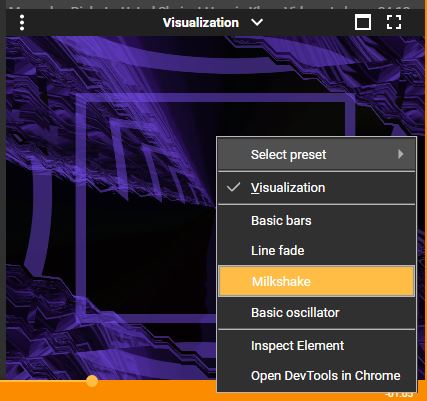
- Select the type of visualization. The choices are: Basic Bars, Line Fade, Milkshake and Basic Oscillator.
- When using Milkshake you can use Select Preset to choose one of the available preset visualizations.
- You can Maximize the Visualization with has it use the full MediaMonkey window.
- You can go Full Screen for the Visualization.
Equalizer
Allows you to customize audio to suit your equipment and environment using a 10-band equalizer. Be sure to save your settings so that you can reload them in the future. This can be configured via Play > Equalizer from the Main Menu. The equalizer allows you to:
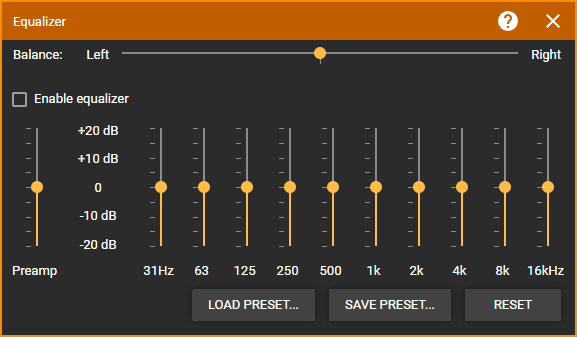
- Change the Balance between left and right.
- Increase or decrease the volume with preamp.
- Change the levels at the different frequencies.
- Save Preset allows you to save the Equalizer settings.
- Load Preset allows to import saved MediaMonkey Equalizer settings. A few pre-configured settings are available in the Equalizer folder where you installed MediaMonkey.
- Reset allows you to reset the Equalizer to the default values.
Crossfading/Silence Removal
Crossfading will blend the previous and next file together as the transition between files. Play > Crossfade from the Main Menu allows you to quickly toggle crossfading on and off. Under File > Options > Layout > Playback rules you can set per Type:
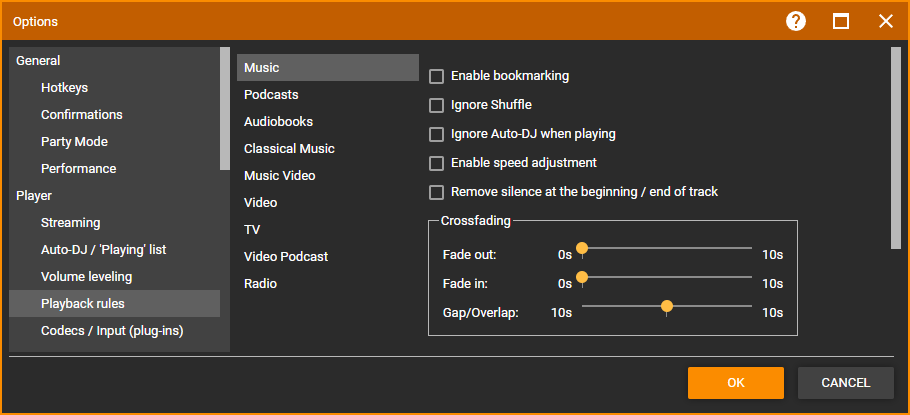
- Remove silence at the beginning / end of track will remove skip the silence at the beginning and end of a file if present.
- Fade out which sets how much before the file's end MediaMonkey should start fading out
- Fade in which sets how much of the start of the file MediaMonkey should fade in
- Gap/Overlap how much gap MediaMonkey should put between files or how much of the files MediaMonkey should overlap with crossfading.
Playback Speed Adjustment
MediaMonkey can adjust the playback speed of your files. Under Play in the Main Menu you can enable/disable Adjust speed and configure its settings:
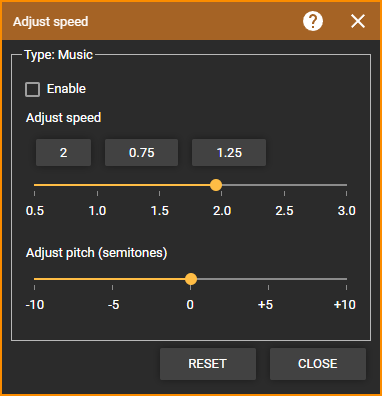
- Adjust speed allows you to set by how much playback speed should be increased.
- Adjust pitch allows you to adjust the pitch during playback, which can be useful when playback speed is increased.
Under File > Options > Layout > Playback rules you can enable/disable Adjust speed per Type.
Pop-up Display
Each time the Player changes playback to a new file, MediaMonkey can show a Pop-up with the new file information. This can be enabled/disabled under Tools > Options > Player from the Main Menu. The Pop-up has additional settings:
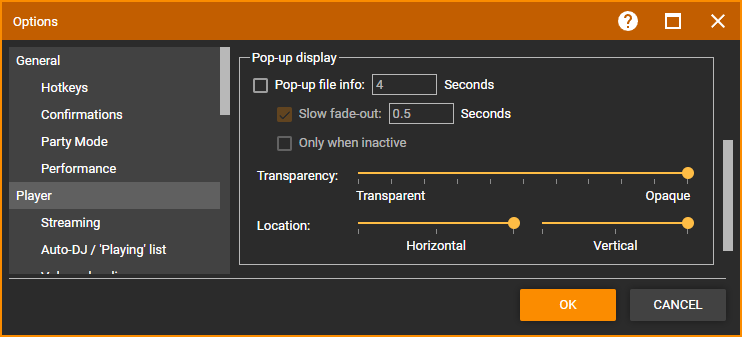
- Pop-up file info If the Pop-up is shown and for how many seconds it should be shown.
- Slow fade-out determines if and how long the Pop-up should fade out.
- Only when inactive will only show the Pop-up when MediaMonkey isn't the active window.
- Transparency controls how transparent the Pop-up will be. A preview will be shown when adjusting this setting.
- Location controls where on the screen the Pop-up will be shown. A preview will be shown when adjusting this setting.
The Play & Skip Counter/Bookmarking
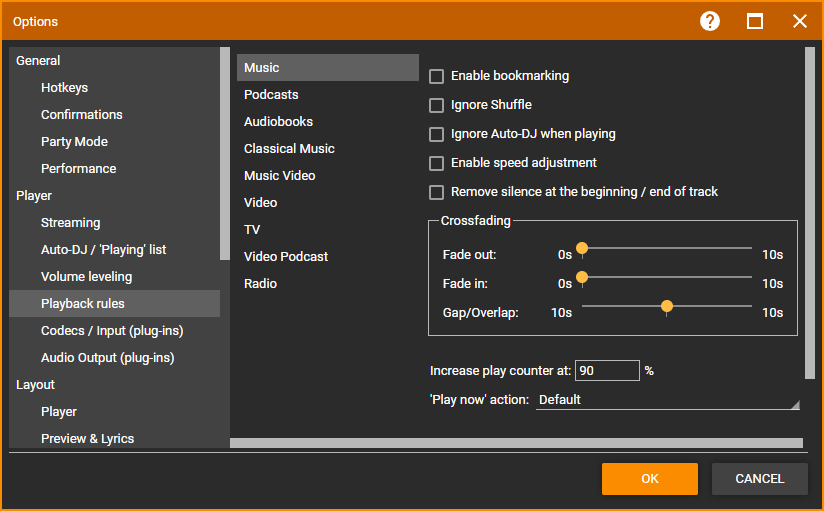
Under Tools > Options > Playback Rules from the Main Menu you can set per Media Type how much of a file needs to be played before the Play counter is updated using Increase play counter at setting.
The Skip counter is updated by 1 when a file is skipped that played over 2 seconds, but with less than 30% of the file played.
Bookmarking can be enabled/disabled per Media Type under Tools > Options > Playback Rules from the Main Menu.
Sleep
If you want files to play for a set period of time and gradually fade and optionally shut down your computer, you can use the Sleep function:
- Enable/Disable using Play > Sleep from the Main Menu.
- You will be prompted to configure:
- Play audio for x minutes
- Whether to gradually fade the volume, at which point the fade should start and to what volume it should lower when fading
- What should happen at the end of the sleep period. This includes options to do nothing, shutdown , hibernate, sleep or log off computer, close MediaMonkey, or to do nothing.
Note: If shutting down the computer, it's a good idea to close all other applications beforehand, since some applications may ask for a confirmation that would prevent the computer from shutting down.
Customizing the Player
You can customize what is shown in the Player under File > Options > Layout > Player from the Main Menu. This has settings as to which buttons and information should be shown as well as set the Seek bar to show as a standard seek bar or a Waveform bar.
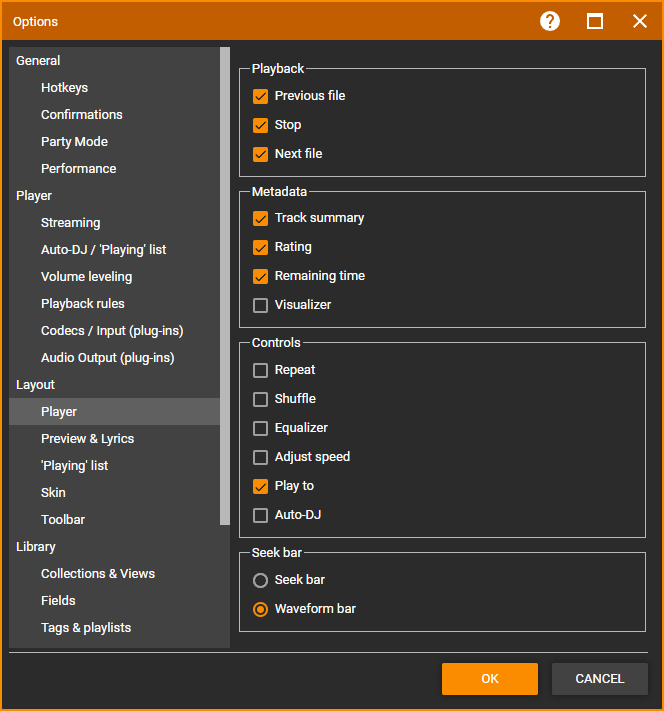
You can also customize what information is shown about the Playing file under Tools > Options > Playback Rules from the Main Menu by changing the Display format for 'Track summary' (e.g. in Player) setting. This is done per Media Type.
Configuring Output
MediaMonkey comes with various Output Plugins to choose from which can be selected and configured under Tools > Options > Audio Output (plug-ins) from the Main Menu:
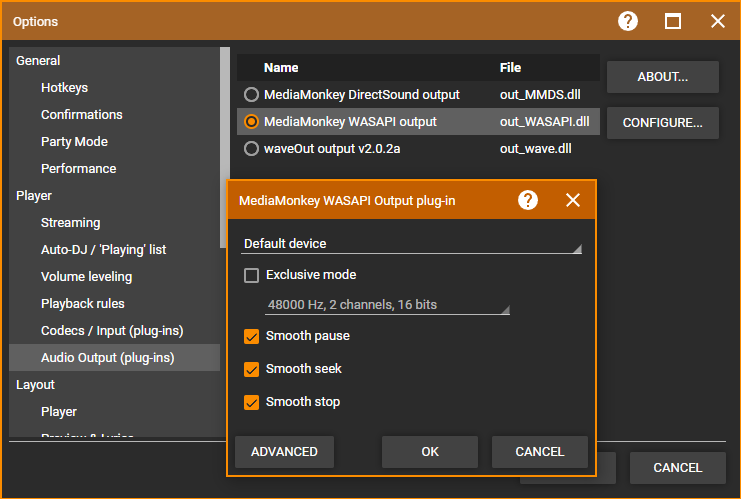
- MediaMonkey DirectSound
- MediaMonkey WASAPI
- waveOut (legacy Output Plug-in)
Configuring the Output Plug-in allows to select what Audio Device on your computer should be used by the Output Plug-in. Default Device or Primary Sound Driver (depends on Output Plug-in) is generally the best and uses what is set as default audio device in Windows. Other options affecting playback like hardware acceleration and smooth pause/seek/stop can be accessed in the Output Plug-in configuration (depending on the Output Plug-in). Using Exclusive mode in the MediaMonkey WASAPI Output Plug-in means only MediaMonkey can use the selected Audio Device.
Video Files
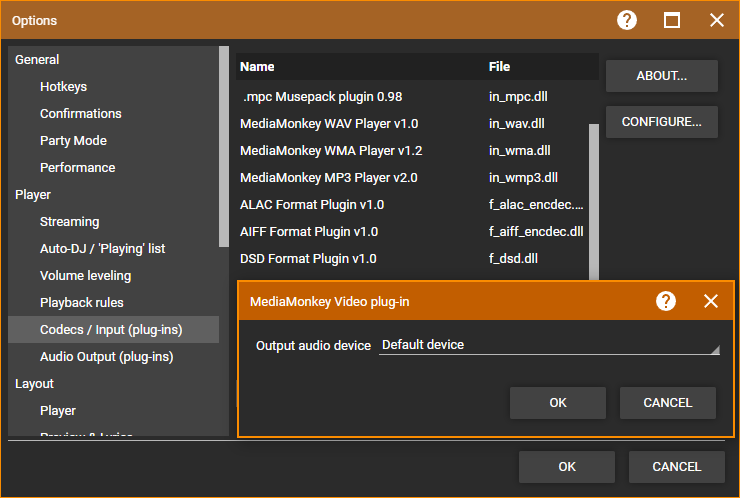
For Video files the Audio Device setting is under Tools > Options > Codec / Input (plug-ins) from the Main Menu in the MediaMonkey Video Player plug-in.
Bluetooth
MediaMonkey can play via Bluetooth if the device running MediaMonkey can connect to a Bluetooth device for playback.
- Either set the Audio Device to Default Device or Primary Sound Driver and switch Windows output device to Bluetooth. (In the Windows Control Panel search for Sound Settings). This will have MediaMonkey switch back to another sound device when the Bluetooth device becomes disconnected (if Windows switches to another sound device).
- Select the Bluetooth device as Audio Device to be used in the Output Plugin settings. This means that you have to switch it to a different Audio Device when the Bluetooth device is no longer connected!
DLNA Streaming/Chromecasting
MediaMonkey can stream to DLNA clients and cast to Chromecast clients which is discussed here: Sharing/Casting your MediaMonkey Library with UPnP (DLNA)/Chromecast Clients
Related
- Sharing/Casting your MediaMonkey Library with UPnP (DLNA)/Chromecast Clients
- Auto-DJ
- Player Plug-ins
- Keyboard and Mouse Shortcuts
- MediaMonkey Customization
- Knowledge Base: Why is Music Greyed Out / Fails to Play?
- Knowledge Base: No Sound is Playing / Sound is Corrupted
| English |
Additional Help: Knowledge Base | Forum | MediaMonkey Support | MediaMonkey for Android Help | MediaMonkey 5 Help | MediaMonkey 4 Help