Filelisting
Wiki Home > MediaMonkey 5 Help > Filelisting
Introduction
The Filelisting shows a list of media files corresponding to the node selected in the Media Tree and is shown in the Main Panel in MediaMonkey. The Main Panel can't be disabled. The Main Panel also shows Device Profiles, Cloud Service Profiles, Streaming Service Profiles and the websites in the Web node.
-

Filelisting Browser View
-
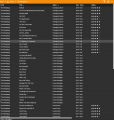
Filelisting List View
-

Filelisting List (by Album) View
-
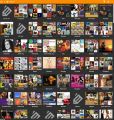
Filelisting Grid (by Genre) View


The Filelisting can be configured to show your media files in a variety of ways including a simple file list, a list with Artwork, grids of Artwork as well as a browser style with additional information about the content shown. The Filelisting can show different Elements and Columns and be sorted. What Views, Elements, Columns and Sorting is available depends on what content you're viewing.
Changing Views
The Filelisting can be shown in various different ways. Which Views are available depends on the content being shown (ie. which node in the Media Tree is selected). You can change View under View > Main Panel View from the Main Menu:
- List shows a basic list of your media files and their tags.
- List (by Album), enhances the basic list with Artwork and groups files together.
- List (by Album) comes with an extra option to show all Albums collapsed or expanded (shows all files). You can switch using the two arrow button next to the Filter button at the right top of the Filelisting.
- Grid (****) shows a grid of Artwork organized by a tag value (like Albums or Genres depending on what node in the Media Tree you're in).
- Browser provides a rich experience which can include a text description (like information about the Artist), Albums, Top Tracks and Related Artists.
The Playing node has its own View options:
- Album art which shows a large Artwork in the Filelisting with Album details and Lyrics.
- Artist bio which shows Artist Artworks and a short bio.
- Lyrics which shows the Lyrics for the file.
- List which shows the list of files in the Playing queue.
Alternative Views can be added through Addons.
Changing which Columns are Shown
In the List and List (by Album) views you can select which columns should be shown in the Filelisting. Right click on a Column Header and you can:
- Quickly enable/disable columns from the Context Menu.
- Use Choose columns / Sort to be able to set columns and sort in the Choose columns dialog.
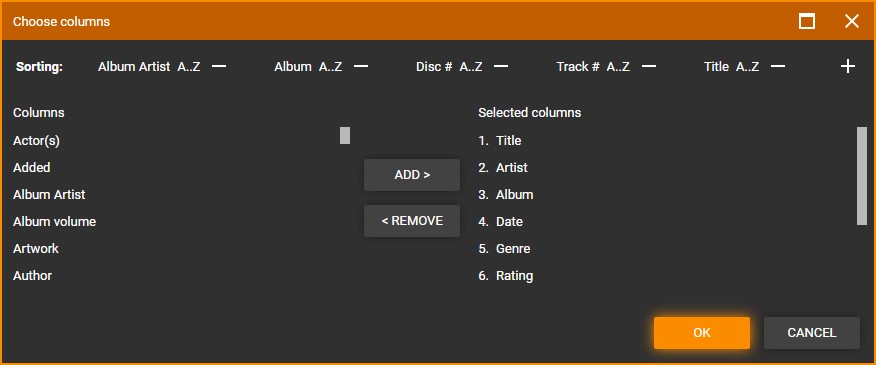
MediaMonkey Filelisting Choose Columns dialog
- You can select an item and use the Add or Remove button to perform the respective action on the column. A Second click on a Column Header will reverse the sort order.
- You can Drag & Drop items to their desired location. You can add, remove as well as sort columns this way in Selected columns.
- Artwork and Summary columns, when available, can't be re-positioned/removed, their position is fixed.

Changing Sorting
MediaMonkey can sort the Filelisting in the List, List (by Album) and Browser views:
- You can quickly sort on a Column by just clicking on the Column Header. This will sort the Filelisting on that tag.
- You can apply multiple sort by first sorting on a Column, then holding down the CTRL Key + click on Column Header(s) to sort on additional Columns.
- You can right click on the Column Headers and use Choose columns / Sort from the Context Menu to apply sorting in the Choose columns dialog.
- You can choose which field to sort on.
- You can set if the sort should be Ascending or Descending.
- You can Add or Remove additional fields to be sorted on.
Changing Elements to be Displayed
The Filelisting can show different Elements using View > Main Panel View from the Main Menu. Which Elements are available depends on which node in the Media Tree is selected and which View is used to view the Filelisting.
- Statusbar, which shows amount of media files shown and their total size and play time.
- Info panel show an Artwork related to the node selected (like Artist Artwork for an Artist node) as well as a Wikipedia description (when available) for the selected node. This information isn't saved to the tags of the files.
- The Info Panel also allows you to set if files are shown from:
- My Library which shows media files in your MediaMonkey Library.
- Online which shows media files available for the selected node in the Media Tree from online sources.
- If the Info Panel matches with the wrong online information you can use the ⋮ Menu button to choose an alternative match to set it to the correct match from Wikipedia. CAUTION: Selecting an alternative match will tag the files with the information from the new match you choose. This menu also allows you to change the language of the description, edit the description or go to the Wikipedia/MusicBrainz website to make edits there.
- The Info Panel also allows you to set if files are shown from:
- Column Filter which is used to filter the Filelisting (see Filtering the Filelisting).
- Tracks which shows top tracks for the selected node in the Media Tree. Top Tracks can be shown as a Simplified list for which you can't edit which Columns are shown and List for which you can customize the Columns shown.
- Related Artists which shows related Artists for the selected Artist in the Media Tree.
- Tree (Folders) shows a folder tree in the Filelisting like in the Media Tree. This useful when you don't have the Media Tree showing.
- Tree (Playlists) shows a folder tree in the Filelisting like in the Media Tree. This useful when you don't have the Media Tree showing.
- List (Folders) shows a list of folders for the selected node in the Collection > Location and Folders node in the Media Tree.
- Grid (Folders) shows a grid of folders for the selected node in the Collection > Location and Folders node in the Media Tree.
Artwork Size
In Grid Views using View > Main Panel View > Image Size allows you to change the size of Artworks in the Filelisting when a Grid view is enabled. When using List (by Album) Views you can resize the Column width to change the Artwork size.
The Toolbar under the Main Menu shows a breadcrumb navigation of where in the Media Tree you are:
- Click on any item listed to navigate to it.
- Click on > right of an item to view all sub-items available. For example when viewing an Artist > will list all Albums by the Artist.
- Use Home to go to the first node in the Media Tree.
- Use Previous and Next to navigate through your browsing history.
Filtering the Filelisting
You can Filter (where available) what's is shown in the Filelisting for a node in the Media Tree to drill down to specific set of files:

- Using Contextual Search
- Column Filter which can be enabled using View > Main Panel View > Column Filter from the Main Menu.
- The Column Filter will only show files in the Filelisting matching the selection in the Column Filter.
- The columns to the right of a column you select an item in will filter based on that selection. So if you have selected a Genre in column 1, the Artist list in column 2 will only show Artists that have media files with the selected Genre of column 1.
- Columns allow you to select multiple values using Ctrl+Click for any additional value selections.
- You can edit which Columns are shown in the Column Filter as well as in which order. Right click on a Column Header to Add, Remove or change what tag is shown in the Column.
- You can double click on an item in the Column Filter and have all files associated with that value added to the Playing (Depends on Default Action settings)
- View Filter, using View > Main Panel View > View Filter from the Main Menu you can use a Criteria based filter on the files in the Filelisting.
Displaying Media Files Recursively
In the Collection > Location and Folders node in the Media Tree MediaMonkey can display files recursively which means it can display the files of the selected drive/folder as well as all media files in the sub-folders of the selected drive/folder.
- To enable the showing of media files for all sub-folders use View > Main panel view > Display folder content recursively from the Main Menu.
- To disable the showing of media files for all sub-folders use View > Main panel view > Display only selected folder's content from the Main Menu.
Managing Views
Under View > Main Panel View > Manage Views you can edit existing Views or create new Custom Views:

- You can Edit existing Views.
- You can Add new Views.
- You can Remove any custom Views (default Views can't be removed).
In the View settings you can set:

- Name which is the name the View should have.
- View type which View is to be used, this also determines which other settings are available.
- Sorting which default sorting the View should use.
- Columns which default Columns the View should show.
- Elements which default Elements the View should show.
| English |
Additional Help: Knowledge Base | Forum | MediaMonkey Support | MediaMonkey for Android Help | MediaMonkey 5 Help | MediaMonkey 4 Help