WebHelp:Changing Filenames/5.0: Difference between revisions
(Created page with " {{WebHelpHeader|Organizing Files and Folders}} == Moving Tracks Manually == Tracks can easily moved from one folder to another: #First select any group of Tracks in the Tr...") |
mNo edit summary |
||
| (17 intermediate revisions by the same user not shown) | |||
| Line 1: | Line 1: | ||
[[Main Page|Wiki Home]] > [[{{WebHelp:Links|Content}}|MediaMonkey 5 Help]] > [[{{WebHelp:Links|Editing Tracks}}|Editing Files]] > Organizing Files and Folders | |||
---- | |||
#First select any group of | {{WebHelpHeader|Organizing Files and Folders}} | ||
#Drag and Drop the selected | |||
{{UseToolWithCaution}} | |||
== Introduction == | |||
MediaMonkey's Library has links to the files in the MediaMonkey Library. This means that you should use MediaMonkey to move/rename your files or MediaMonkey will [[{{WebHelp:Links|Adding_Existing_Files_to_the_Library}}#Manually_Locate_Moved.2FMissing_Files|lose the connection]] to the files. MediaMonkey provides various methods to move or rename your files: | |||
== Moving Files Manually == | |||
Files can easily moved from one folder to another: | |||
#First select any group of files in the Filelisting or Playing window or a folder in the '''[[{{WebHelp:Links|Playback Rules}}|Collections]] > Locations''' or sub-node '''Folders''' node in the Media Tree. | |||
#Drag and Drop the selected files/folder into another folder contained within the '''[[{{WebHelp:Links|Playback Rules}}|Collections]] > Locations''' or sub-node '''Folders''' node in the Media Tree or right-click on the selected files and use '''Send to > Folder (Move)''' from the Context Menu. | |||
All of the files will be moved from their original location to the new location and the MediaMonkey Library will be updated. If the all files in the folder are moved, then you'll also be given the option to move certain accompanying files such as Artwork or Lyrics files. | |||
== Changing Filenames Manually == | == Changing Filenames Manually == | ||
Files can easily be renamed by [[{{WebHelp:Links|Editing_Track_Properties}}#Quick_Edits_via_the_Filelisting_and_Media_Tree|editing]] the Filename or Path column for any file in the Filelisting or by editing in the [[{{WebHelp:Links|Editing_Track_Properties}}#Edit_Properties_of_Multiple_Media_Files_at_Once|Properties]] dialog. | |||
== Auto-Organize Files == | == Auto-Organize Files == | ||
Multiple files can also be renamed/moved using the tags to create folder names and filenames. This is done via the Auto-Organizing, which uses existing file properties to move and rename files according to a specified format. For instance, you could organize all of your files in the following format: C:/Music/<Artist>/<Album> - <Title>.xxx. | |||
=== Manually Auto-Organize Files === | |||
# Select the file(s) that you wish to rename, and use '''Tools > Auto-Organize Files''' from the Main Menu.[[File:Wiki-MM5 Auto-Organize Files.jpg|1000px|center|MediaMonkey Auto-Organize Files dialog]]<br><br> | |||
# Choose whether to: | |||
# *'''Move''' the files (if you're organizing tracks on your hard drive). Enable ''Delete emptied folders'' if you wish the original folder(s) to be deleted after all files have been removed from it. | |||
#*'''Copy''' the files (if you're copying files to or from another source e.g. to copy an iPod). Enable ''Add copied files to the Library'' if you wish the copied files to be added to the MediaMonkey Library. | |||
# Choose the '''Destination''' to be used for the files. Destination uses [[{{WebHelp:Links|Configuring_Directory_and_File_Formats}}|Masks]] to define how the files will be renamed. If the Destination [[{{WebHelp:Links|Configuring_Directory_and_File_Formats}}|Mask]] results in duplicate Paths MediaMonkey will append a number in parenthesis to prevent files from being overwritten. | |||
# ''Delete emtpied folders'' will will remove the original folder the media files resided it if it becomes empty after moving the files. | |||
# The Auto-Organize dialog will show the changes it will make in the ''New Path'' column based on the Destination [[{{WebHelp:Links|Configuring_Directory_and_File_Formats}}|Mask]] you set. If any of the new folder/filenames are incorrect, edit the Destination [[{{WebHelp:Links|Configuring_Directory_and_File_Formats}}|Mask]], edit the individual file's Path as needed by slow double clicking or F2 the path in the ''New Path'' column and editing it, or uncheck the files you wish to exclude from Auto-Organizing. '''Make sure you verify the changes MediaMonkey will make before applying them. There is no undo!''' | |||
# Click '''OK''' to have MediaMonkey Move or Copy the files. | |||
When media files are moved, it may result in the original folders becoming empty of media files, while other files still reside in it. If this occurs, you will be prompted whether to move any accompanying files (e.g. Artwork or Lyrics files). This will move the selected file(s) to the same folder as the media files were moved to.[[File:Wiki-MM5 Auto-Organize Files Accompanying Files.jpg|578px|center|MediaMonkey Auto-Organize Files Accompanying Files dialog]] | |||
=== Auto-Organize as a Background Process === | |||
MediaMonkey can also Auto-Organize as a background process. Auto-Organize is a [[{{WebHelp:Links|Upgrading_to_the_Gold_Version}}#Gold_Features|Gold Feature]]. Auto-Organize will run any time a file is first [[{{WebHelp:Links|Adding_Existing_Files_to_the_Library}}|added]] to the MediaMonkey Library or when a file is [[{{WebHelp:Links|Editing_Track_Properties}}|edited]] in MediaMonkey. Enabling an Auto-Organize rule won't organize any files already in the MediaMonkey Library that don't match the new rule. Those will require the use of [[{{WebHelp:Links|Changing Filenames}}#Auto-Organize_Files|Auto-Organize Files]] with the same [[{{WebHelp:Links|Configuring_Directory_and_File_Formats}}|Mask]] as the Auto-Organize rule. | |||
To enable Auto-Organize, go to '''Tools > Options > Auto-Organize''' from the Main Menu and configure a rule for different subsets of your MediaMonkey Library. Once rules have been configured you can either: | |||
*Go to the '''[[{{WebHelp:Links|Playback_Rules}}#Collections|Collections]] > [[{{WebHelp:Links|Library}}#Files_to_Edit|Files to Edit]] > [[{{WebHelp:Links|Library}}#Unorganized_Files|Unorganized Files]]''' node and use the [[{{WebHelp:Links|Changing Filenames}}#Auto-Organize_Files|Auto-Organize Files]] to organize files that don't match the desired format | |||
*Enable ''Automatically organize files (during scans and edits)'' to have this done of automatically when files are scanned or edited | |||
''Note: when media files are organized as a background process, any accompanying files in the same directory are automatically moved as well.'' | |||
== Related == | |||
* [[{{WebHelp:Links|Configuring_Directory_and_File_Formats}}|Folder/Filename Masks]] | |||
{{WebHelpFooter}} | |||
Latest revision as of 20:10, 4 January 2021
Wiki Home > MediaMonkey 5 Help > Editing Files > Organizing Files and Folders
Introduction
MediaMonkey's Library has links to the files in the MediaMonkey Library. This means that you should use MediaMonkey to move/rename your files or MediaMonkey will lose the connection to the files. MediaMonkey provides various methods to move or rename your files:
Moving Files Manually
Files can easily moved from one folder to another:
- First select any group of files in the Filelisting or Playing window or a folder in the Collections > Locations or sub-node Folders node in the Media Tree.
- Drag and Drop the selected files/folder into another folder contained within the Collections > Locations or sub-node Folders node in the Media Tree or right-click on the selected files and use Send to > Folder (Move) from the Context Menu.
All of the files will be moved from their original location to the new location and the MediaMonkey Library will be updated. If the all files in the folder are moved, then you'll also be given the option to move certain accompanying files such as Artwork or Lyrics files.
Changing Filenames Manually
Files can easily be renamed by editing the Filename or Path column for any file in the Filelisting or by editing in the Properties dialog.
Auto-Organize Files
Multiple files can also be renamed/moved using the tags to create folder names and filenames. This is done via the Auto-Organizing, which uses existing file properties to move and rename files according to a specified format. For instance, you could organize all of your files in the following format: C:/Music/<Artist>/<Album> - <Title>.xxx.
Manually Auto-Organize Files
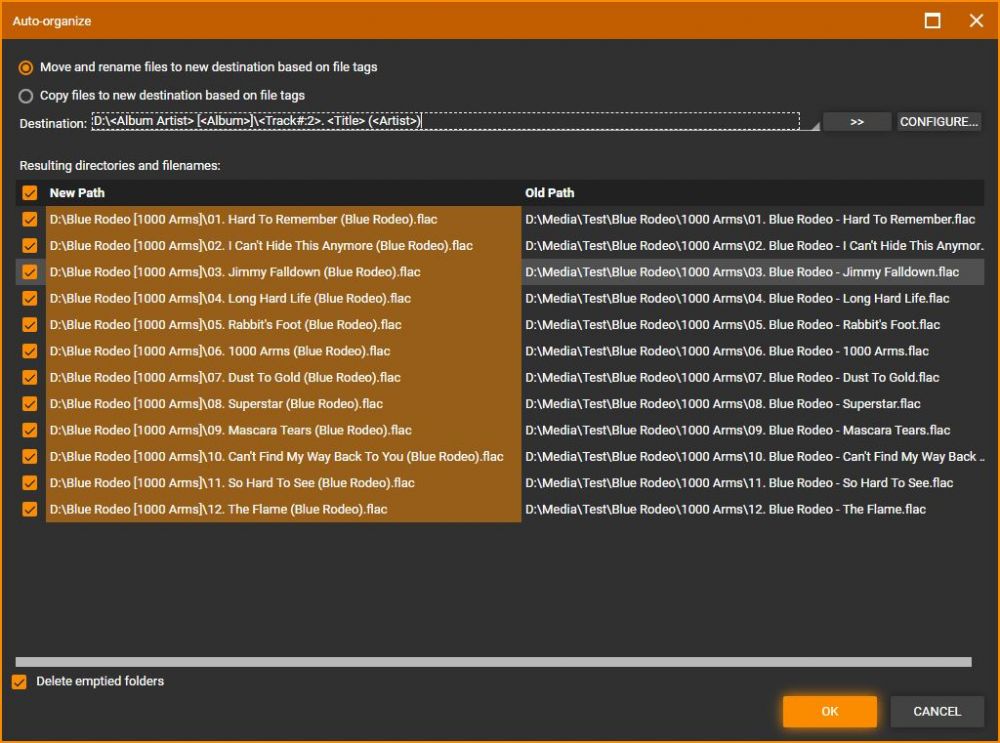
- Select the file(s) that you wish to rename, and use Tools > Auto-Organize Files from the Main Menu.

MediaMonkey Auto-Organize Files dialog - Choose whether to:
- *Move the files (if you're organizing tracks on your hard drive). Enable Delete emptied folders if you wish the original folder(s) to be deleted after all files have been removed from it.
- Copy the files (if you're copying files to or from another source e.g. to copy an iPod). Enable Add copied files to the Library if you wish the copied files to be added to the MediaMonkey Library.
- Choose the Destination to be used for the files. Destination uses Masks to define how the files will be renamed. If the Destination Mask results in duplicate Paths MediaMonkey will append a number in parenthesis to prevent files from being overwritten.
- Delete emtpied folders will will remove the original folder the media files resided it if it becomes empty after moving the files.
- The Auto-Organize dialog will show the changes it will make in the New Path column based on the Destination Mask you set. If any of the new folder/filenames are incorrect, edit the Destination Mask, edit the individual file's Path as needed by slow double clicking or F2 the path in the New Path column and editing it, or uncheck the files you wish to exclude from Auto-Organizing. Make sure you verify the changes MediaMonkey will make before applying them. There is no undo!
- Click OK to have MediaMonkey Move or Copy the files.
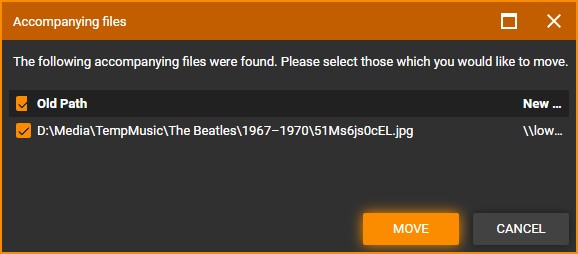
When media files are moved, it may result in the original folders becoming empty of media files, while other files still reside in it. If this occurs, you will be prompted whether to move any accompanying files (e.g. Artwork or Lyrics files). This will move the selected file(s) to the same folder as the media files were moved to.

Auto-Organize as a Background Process
MediaMonkey can also Auto-Organize as a background process. Auto-Organize is a Gold Feature. Auto-Organize will run any time a file is first added to the MediaMonkey Library or when a file is edited in MediaMonkey. Enabling an Auto-Organize rule won't organize any files already in the MediaMonkey Library that don't match the new rule. Those will require the use of Auto-Organize Files with the same Mask as the Auto-Organize rule.
To enable Auto-Organize, go to Tools > Options > Auto-Organize from the Main Menu and configure a rule for different subsets of your MediaMonkey Library. Once rules have been configured you can either:
- Go to the Collections > Files to Edit > Unorganized Files node and use the Auto-Organize Files to organize files that don't match the desired format
- Enable Automatically organize files (during scans and edits) to have this done of automatically when files are scanned or edited
Note: when media files are organized as a background process, any accompanying files in the same directory are automatically moved as well.
Related
| English |
Additional Help: Knowledge Base | Forum | MediaMonkey Support | MediaMonkey for Android Help | MediaMonkey 5 Help | MediaMonkey 4 Help
