WebHelp:Ripping Tracks from CDs/5.0: Difference between revisions
Jump to navigation
Jump to search
mNo edit summary |
mNo edit summary |
||
| Line 18: | Line 18: | ||
# If you want to Rip the Audio CD use '''Tools > Rip Audio CD''' from the Main Menu, Rip Audio CD from the Context menu of the CD node in the Media Tree or Rip Audio CD from the Context menu of selected Track(s) on the Audio CD in the Filelisting. | # If you want to Rip the Audio CD use '''Tools > Rip Audio CD''' from the Main Menu, Rip Audio CD from the Context menu of the CD node in the Media Tree or Rip Audio CD from the Context menu of selected Track(s) on the Audio CD in the Filelisting. | ||
# The Rip CD dialog will appear, from which you may configure:<br>[[File:Wiki-MM5 CD Rip Dialog.jpg|800px|center|MediaMonkey Audio CD Rip dialog]] | # The Rip CD dialog will appear, from which you may configure:<br>[[File:Wiki-MM5 CD Rip Dialog.jpg|800px|center|MediaMonkey Audio CD Rip dialog]] | ||
#* ''Destination'' which determines the Folder and Filename format to be used to save the files from the CD. Choose the | #* ''Destination'' which determines the Folder and Filename format to be used to save the files from the CD. You can save files to an internal or external hardrive, or a network share. Choose the Path in which your files will be saved by clicking the 'Configure...' button to choose the location where the files will be saved. See: [[{{WebHelp:Links|Configuring Directory and File Formats}}|Configuring Directory and Filename Formats]] | ||
#* | #* ''Format'' defines what File Type the files should be saved at and what settings for that File Type should be used. For more on this see: [[{{WebHelp:Links|Basic Concepts}}|Digital Ripping & Digital File Formats]] | ||
#* | #* ''Rip Settings'' define how MediaMonkey should Rip the files. | ||
#** Rip Type | |||
#** ''Eject CD after Ripping'' will eject the CD once the Rip process is completed. | |||
#** ''Level Track volume'' will [[{{WebHelp:Links|Volume Leveling}}|level the volume]] of the Ripped files according to the settings under ''File > Options > Volume Leveling''' from the Main Menu. | |||
#** 'Verify ripped tracks'' ([[{{WebHelp:Links|Upgrading_to_the_Gold_Version}}|Gold feature]]) will check the accuracy of the Ripped files against AccurateRip. The information is presented at the end of the Rip process and can help determine how good a copy was created. | |||
#** ''On the fly encoding'' will start encoding files to the chosen File Type while Ripping files from the CD. This is enabled by default and can be disabled if there are problems during Ripping. | |||
:: Press 'Ok' to rip selected Tracks. | :: Press 'Ok' to rip selected Tracks. | ||
Revision as of 22:03, 7 December 2020
Wiki Home > MediaMonkey 5 Help > Adding Media Files & CDs > Ripping Tracks from CDs
MediaMonkey can help you copy your CDs to your PC. This will allow you to play the files without the CD inserted as well as Sync the files to a device or stream them to a UPnP/DLNA client.
MediaMonkey can Rip Audio CDs as well as copy media files from Data CDs. MediaMonkey can't Rip DVDs/BluRays.
Copy a Data CD
- Insert the Data CD into your PC.
- Browse to the CD in the Folders node in the Media Tree.
- Select the files on the CD and then you can copy the files using Copy & Paste or use Auto-Organize Files set to Copy
Rip an Audio CD
- Insert the Audio CD into your PC.
- MediaMonkey will lookup the Audio CD based on you settings under Tools > Options > Metadata lookup from the Main Menu by changing the Audio CD metadata lookup settings. If multiple matches for your Audio CD are found MediaMonkey will prompt which one you'd like to use.
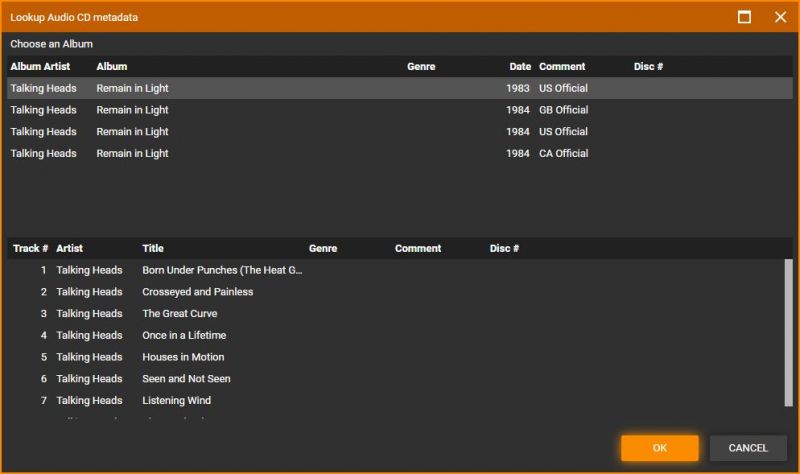
Audio CD Lookup Confirmation - The Audio CD should appear in the Media tree, but is also available in Folders node in the Media Tree.
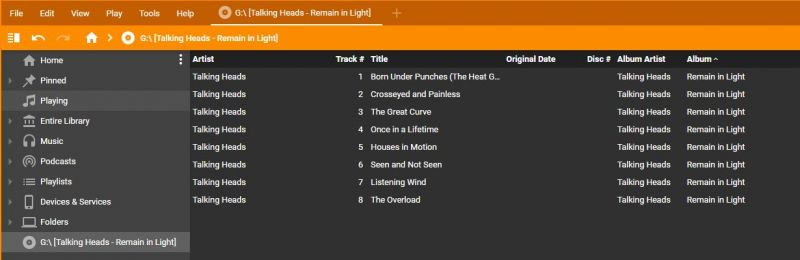
Audio CD shown in MediaMonkey - When you select the CD in the Media Tree you can edit the files tags prior to Ripping the Audio CD so that the files are Ripped with the correct metadata as well as folder/filenames.
- If you want to Rip the Audio CD use Tools > Rip Audio CD from the Main Menu, Rip Audio CD from the Context menu of the CD node in the Media Tree or Rip Audio CD from the Context menu of selected Track(s) on the Audio CD in the Filelisting.
- The Rip CD dialog will appear, from which you may configure:
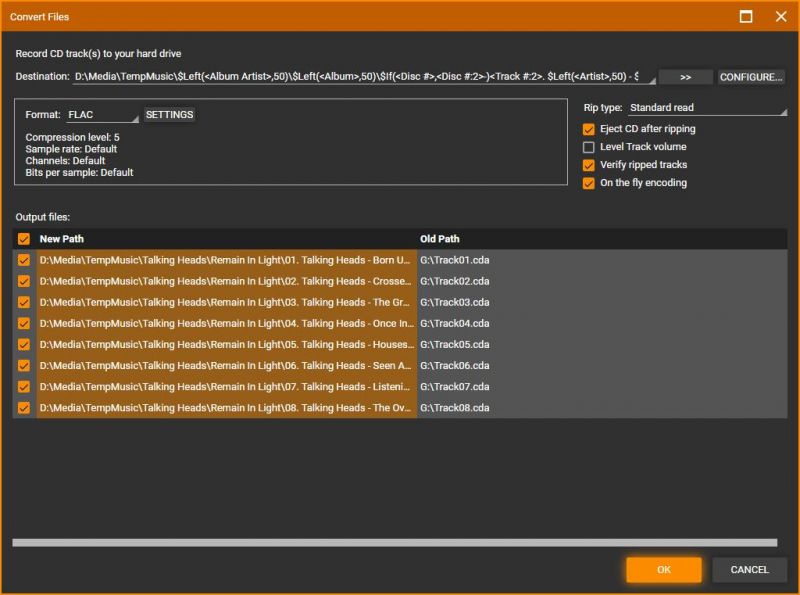
MediaMonkey Audio CD Rip dialog - Destination which determines the Folder and Filename format to be used to save the files from the CD. You can save files to an internal or external hardrive, or a network share. Choose the Path in which your files will be saved by clicking the 'Configure...' button to choose the location where the files will be saved. See: Configuring Directory and Filename Formats
- Format defines what File Type the files should be saved at and what settings for that File Type should be used. For more on this see: Digital Ripping & Digital File Formats
- Rip Settings define how MediaMonkey should Rip the files.
- Rip Type
- Eject CD after Ripping will eject the CD once the Rip process is completed.
- Level Track volume will level the volume of the Ripped files according to the settings under File > Options > Volume Leveling' from the Main Menu.
- 'Verify ripped tracks (Gold feature) will check the accuracy of the Ripped files against AccurateRip. The information is presented at the end of the Rip process and can help determine how good a copy was created.
- On the fly encoding will start encoding files to the chosen File Type while Ripping files from the CD. This is enabled by default and can be disabled if there are problems during Ripping.


- Press 'Ok' to rip selected Tracks.
Once the tracks have been recorded, you'll receive a confirmation that they've been recorded correctly, and you'll be able to access the tracks in your library even after you've removed the CD.
| English |
Additional Help: Knowledge Base | Forum | MediaMonkey Support | MediaMonkey for Android Help | MediaMonkey 5 Help | MediaMonkey 4 Help