Wi-Fi Sync
Wiki Home > MediaMonkey for Android Help
Introduction
This help document describes how to Wi-Fi Sync with MediaMonkey on your desktop. Alternatively you can use other methods to Sync like USB Sync or Sync directly to an SD Card.
Requirements
To do a WiFi Sync from MediaMonkey for Android you'll need:
- MediaMonkey for Android with either the Wi-Fi Addon or Pro version
- MediaMonkey for desktop
- A Media Server running on MediaMonkey for desktop
- Both MediaMonkey for Android and MediaMonkey for desktop connected to the same network
Setup
There are 2 parts to setting up Wi-Fi Sync:
- Setting up the connection between MediaMonkey for Android and MediaMonkey for desktop
- Setting up the Sync settings
Connection Test
You can test if MediaMonkey for Android can connect to MediaMonkey for desktop using UPnP on the Homescreen in MMA. This step is not necessary and can be skipped.
- Tap UPnP on the homescreen
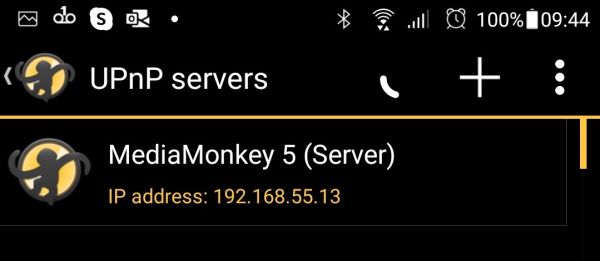
MMA UPnP Servers - Select the Media Server from MediaMonkey for desktop
- MediaMonkey for desktop may prompt to allow the connection
- If the Media Server fails to show please read: MediaMonkey DLNA / UPnP Server Inaccessible / Casting Fails
- Browse the UPnP Server from MediaMonkey for desktop
Sync Setup
To setup Sync the first time:
- Go to Options in MediaMonkey for Android
- Scroll to the Wi-Fi Sync section
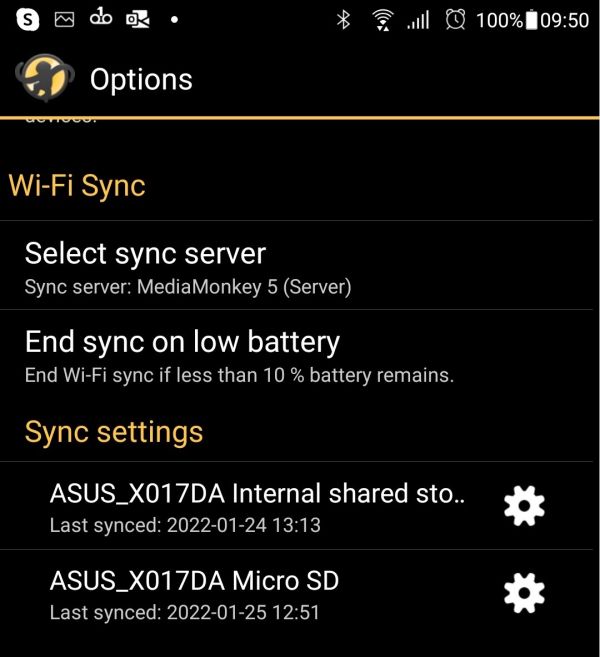
MMA Options Wi-Fi Sync - Tap Select sync server.
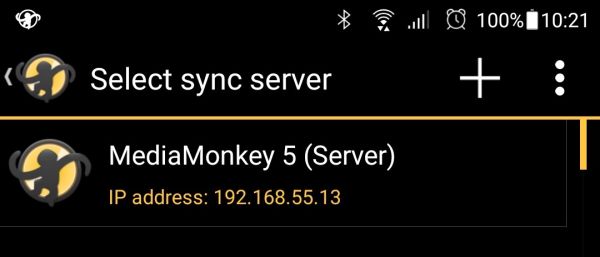
MMA Options Wi-Fi Sync Select Sync Server - Select the Media Server from MediaMonkey for desktop as you Sync server.
- If the Media Server fails to show please read: MediaMonkey DLNA / UPnP Server Inaccessible / Casting Fails
- If you have multiple storage locations (like an SD card) on your device select which storage location you want to Sync to.
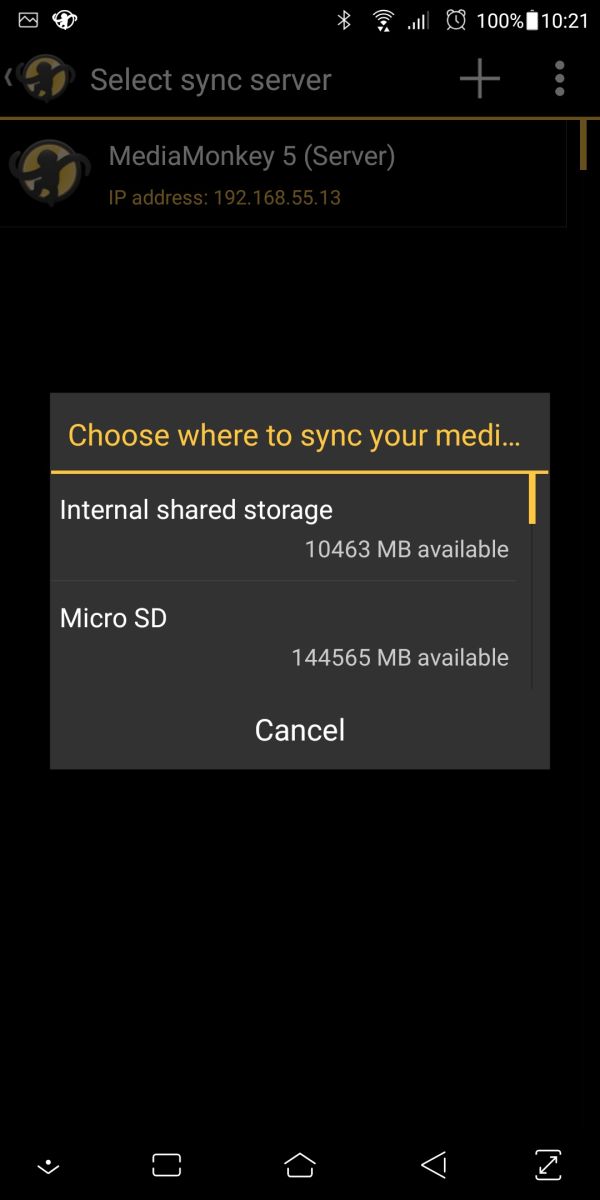
MMA Options Wi-Fi Sync Select Storage - The next screen will allow you setup the Sync settings.
Sync Configuration
You can choose to setup the Sync settings which includes what to Sync and what to delete in MediaMonkey for Android or MediaMonkey for desktop.
- MediaMonkey for desktop provides more settings and can be quicker to setup. Both MediaMonkey for Android and MediaMonkey for desktop use the same settings saved by MediaMonkey for desktop. For a detailed explanation on how Sync works and how to do the setup on MediaMonkey for desktop you can read: Syncing Files to Portable Devices
In MediaMonkey for Android the following settings for Sync are available:
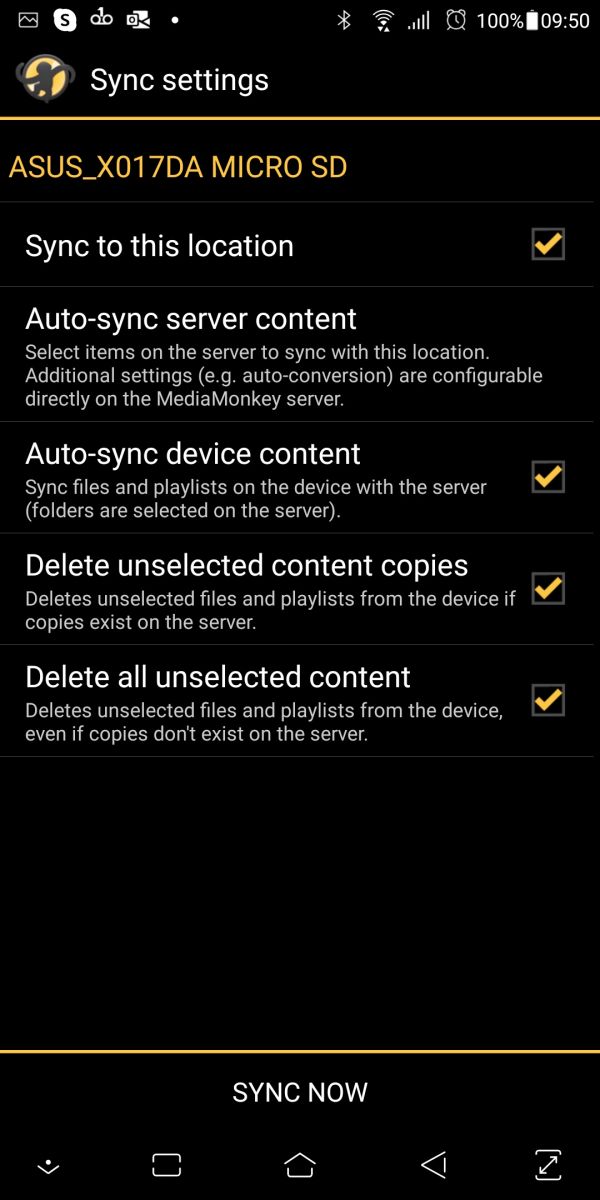
Sync to this location
This option allows to enable/disable that storage to be Synced to by MediaMonkey. You may only want to Sync to a single storage.
Auto-sync server content
This will allow you to select what content from MediaMonkey for desktop should be Synced to MediaMonkey for Android. You can select Playlists, Collections or individual Artists, Genres, etc. to be Synced. The content shown here is controlled by what is being shared by the Media Server in MediaMonkey for desktop.
Auto-sync device content
This option will Sync media files from your Android device to MediaMonkey for desktop if it isn't present in your MediaMonkey for desktop Library.
Delete unselected content copies
This option will delete any media files and Playlist from your Android device that are no longer selected to be Synced to your device, but are still present in the MediaMonkey for desktop Library.
Delete all unselected content
This option will also delete any media files and Playlists from your Android device that are not selected to be Synced to your device, and no longer present in your MediaMonkey for desktop Library (like removed Podcast episodes).
Running Sync
To run a Wi-Fi Sync tap Sync now on the homescreen in MediaMonkey for Android. This will run a Sync via Wi-Fi using the settings you've setup for Sync.
- Wi-Fi Sync can only be initiated from MediaMonkey for Android.
- If Wi-Fi Sync fails to run please read: Wi-Fi Sync doesn’t work
Depreciated
When MediaMonkey for Windows (the MediaMonkey server) syncs with an Android device, it is capable of syncing tracks and playlists, including metadata such as Artist, Album, Title, and Track#, ratings, volume leveling information, play history, play count, bookmarks, Album Artist, Composer, Lyrics, and Album Art. Whenever any of these attributes are updated on either the server or the device, MediaMonkey is able to sync the change so that your library appears the same no matter how it's being accessed. For instance:
- Once a track has been synced, MediaMonkey will notice if you've played a song on your device, added it to a playlist or changed it's rating, and MediaMonkey will then sync this information between the device and server.
- If you've added music files to your mobile devices from other sources since the last sync, MediaMonkey can optionally retrieve these files from your mobile phone and import them into your MediaMonkey library.
- MediaMonkey can optionally erase media files on your device that aren't selected to be synced.
The richness of this functionality depends on whether MediaMonkey for Android is installed on the remote device, what sync mode has been chosen (auto-sync vs manual), how the server and device are connected (Wi-Fi or USB), and what options are enabled.
Sync Options
Software
MediaMonkey for Windows 4.1+ can sync with any Android device, and is able to sync tracks and playlists along with basic metadata (Artist, Album, Title, Track#, Album Art) as it would to any MTP device, but Android players that rely on the default Android media scanner will be limited to viewing that basic metadata.
Some Android players may also able to read file tags directly, in which case they may also view ratings, volume leveling information, Album Artist, Composer, and Lyrics, Album Art, and fields that have multiple attributes from tracks that have been synced. However, changes in the metadata may not necessarily sync back to MediaMonkey for Windows.
To view & sync all of the above content and metadata--along with play history, play count, and bookmarks, MediaMonkey for Android should be installed on the Android device.
Auto-Sync vs. Manual sync
There are two ways in which you can move music files to your mobile device: automatically (Auto-sync) and manually.
Auto-sync uses a pre-defined list of files of your choosing and syncs them with your device. These lists are configured either on the MediaMonkey server or in MediaMonkey for Android, where you can choose what content should be synced (e.g. Entire library, a randomized selection, songs of a certain band/genre/album, or only songs from a specific playlist such as "Driving music", "New purchases", "3+ star Music", "Workout" playlists, etc.). The point is that you define what should be synced once - and every time you Auto-sync, Mediamonkey will update content according to the defined criteria. An auto-sync can either be initiated automatically whenever you connect your device, or by clicking Auto-sync on the MediaMonkey server or in MediaMonkey for Android.
Manual syncing in contrast allows you to pick individual songs/albums/playlists etc and send them manually over to your device. To initiate a manual sync, right-click on the desired song/album/playlist and select "Send to", then select your device. Manual syncing requires a USB connection, although you can download tracks from a UPnP server over Wi-Fi to achieve similar results.
Wi-Fi Sync vs. USB Sync
MediaMonkey for Windows (MMW) can sync with an Android device running MediaMonkey in several different ways:
- Wi-Fi sync. This is the preferred and most convenient way to sync content between a Mediamonkey server and an Android device. However, because it's over Wi-Fi it can be a slow if you're syncing more than eg. 1-2 GB of music.
- USB sync. Syncing via a USB cable connected to your device is faster than Wi-Fi, however, it can be unreliable/slow with certain devices especially for first time syncs which can involve transferring several GB of content.
- SD card 'sync'. You can also 'sync' directly to an SD card inserted in your PC running MediaMonkey for Windows and then subsequently use USB or Wi-Fi Sync for updates. This is inconvenient for general usage, but can be useful for first-time synchronization as it can be up to 5x as fast as USB sync.
Wi-Fi Sync
You'll need:
- Mediamonkey for Windows (MMW), version 4.1+
- Mediamonkey for Android (MMA), with Wi-Fi Sync active (i.e. Trial mode is active OR MediaMonkey Pro or the Wi-Fi Sync Addon have been purchased)
- Both your computer running MMW and your Android device running MMA need to be connected to the same WiFi network.
To set up Wi-Fi syncing:
- If you've been syncing to your device using earlier versions of MediaMonkey, then you should do an initial sync over USB using MediaMonkey 4.1 prior to a Wi-Fi sync in order to update your existing profile for Wi-Fi Sync.
- On your desktop machine running MMW, make sure that Wi-Fi Sync is enabled (by default, this is pre-configured, and no action should be required):
- If you're using an existing sync profile, go to that Device Profile (Tools > Options > Portable Device Sync) and make sure that 'Grant Remote Access / Sync rights' is enabled.
- Then go to Tools - Options - Media Sharing, and set up the sharing options for your library. When MMA (or any UPnP player) is browsing into the MediaMonkey server, it will see only the libraries and playlists that are shared--so if items aren't accessible over UPnP, they won't be accessible to MMA for Wi-Fi sync.
- Start MediaMonkey (MMA) on your Android device, access the Options menu and scroll down to "Wi-Fi Sync". Choose "Select Sync Server" and select the MMW server that you set up in step 2.
Note: If you don't see the MediaMonkey server, make sure that MMW is running, that both your computer and your Android device are connected to the same network, and that the Windows firewall has an active exception defined for Mediamonkey. - On your desktop, MMW will prompt you to confirm that you allow your Android device to connect and sync. Confirm.
MMW will create/update a synchronization profile for your Android device. If your device supports external storage, 2 profiles will be created one for Internal and one for External storage. - Configure your sync profile(s). If two profiles exist, you can set up one or the other, or even both (each with a unique sync list). You can set up your sync profile(s) either in MMA or MMW (the settings are shared), but at the moment, it's recommended that you do so in MMW as more options are available.
- In MMW, go to Tools - Options - Portable Device Sync
If you're only going to use one profile select any device profiles that you're not using and uncheck them to disable them.
Highlight the device profile that you're using, and click "Configure" to select which Tracks/Artists/Albums/Genres/Folders/Playlists etc. should be synced over to your device. - If you're configuring via MMA,in Options, select the sync profile tha you want to configure.
Choose which content you want to keep in sync
- In MMW, go to Tools - Options - Portable Device Sync
- In MMA, click on the "Sync now" tile on the start screen and wait for the sync to complete. Note that WiFi syncing will be slower than syncing over an USB cable, so be patient, especially if your initial sync is over Wi-Fi. It can take several hours to sync a few thousand tracks.
USB Syncing
USB sync can be useful for first-time synchronization as it is much faster than Wi-Fi, or if you don't have MMA on your your Android device. However, it can be slow/problematic on certain devices.
- If you plan on using MediaMonkey for Android on your device, run it at least once in order to create a database on the device (if you don't plan on using MMA, this isn't necessary, though not all metadata will sync).
- Plug your Android device into a USB port of your computer.
- In MediaMonkey for Windows, click on the device to view the Device Profile (Tools > Options > Portable Device Sync) that is created (if you have an SD card in your device you'll see 2 Device Profiles)
- Grant remote access / sync rights if you plan on doing Wi-Fi Syncs in the future on the Summary tab of the Device Profile
- Switch to the "Auto-Sync (-> device)" tab to choose which files to sync with your device.
- Configure any other details you wish (e.g. Bi-directional synchronization, Format conversion, etc.)
- Save the settings (click OK), and click Auto-Sync.
- Wait for the sync to complete (watch the progress bar) - then safely eject your device (if it's configured as a Mass Storage Device) and unplug it from your computer.
See more about MTP and USB devices: Devices and Plugins
First-time 'sync' to an SD Card
The SD card should contain enough space for the library. You can not sync MediaMonkey with the existing files on an SD card: it will not make the match between the two locations/files. For syncing to work, files must first be synced from MMW by copying them to the SD Card.
If there are files on the SD card that aren't on the windows machine, and you wish to add them to the MMW library, copy them to the Windows machine first and add them to the MMW library *before* first sync.
Note: Because of the time required for first sync, first sync to the SD card should be managed with the SD card placed into the Windows device's card reader. Follow the instructions for this below.
After syncing initially with the SD card directly on the windows device, return it to the Android device and sync via USB or WiFi for following syncs.
Also, if the files in the MMW library are stored on a cloud service, the sync will require downloading of each file for copying during the sync process. This will add significantly to the amount of time required for full sync.
SD Card Preparation
- Make sure the correct SD card is inserted in the Android device before setup
- Install and open MMA on the Android device
- Connect the Android device to the Windows computer via USB and allow file transfer
- In MMW, set up a 'Device Profile' for the Android device's SD card (Tools > Options > Portable Device Sync)
- Initiate a USB Sync from MMW
- [For WiFi sync only] Verify that the MMW Library/Collection is shared via WiFi (MMW > Tools > Options > UPnP/DLNA). Initiate WiFi Sync from MMA for the location containing the SD card (without syncing any tracks). MMW will prompt you to allow the device to connect, and will create a profile for the device.##Highlight and check the box for the SD Card from the list of available devices at (Tools > Options > Portable Device Sync > Available Devices)
- Deselect other devices in the list
- Click the Configure button. A window will appear.
- Select the menu "Auto-Sync (--> Device)"
- Deselect all folder check-boxes in the window. To completely deselect a shaded folder, you may need to expand the top level folder by clicking on the '>' next to it. This will open a list of sub-folders. Deselect any folders that appear with check marks. Any shaded folders will need to be opened further with the ">" option, and subfolders deselected.
- Click "Okay", then "Okay" again on the next window that appears
- This will create a profile for the device, and ensure that the same profile is used for card slot sync, USB sync, and WiFi Sync.
- Eject the Android device from the Windows machine, either by using the Windows task-bar eject command or simply unplugging the USB connection. This depends on Windows version.
- After ejecting the Android device, remove the SD Card from it. The card is now identified as a target device.
SD Card First Sync
- Insert the SD Card into the PC running MMW (via an SD card reader).
- In MMW, make sure that the Media Tree is showing at the left of the MMW window (Menu > View > Media Tree).
- Verify that the SD card appears in MMW in the tree.
- Select the device in the tree (or via MMW Tools -> Options -> Portable Devices). Configure which files to sync, making sure not to exceed device capacity.
- (Optional) Setup Conversion rules and any other sync settings.
- Click the 'Sync' button that appears next to the device in MMW.
- Once sync has completed, eject SD card from the PC (via Windows taskbar) and replace into the Android device.
- (For wifi sync) Start MMA and do a WiFi Sync to update metadata on synced files. If you don't perform this step, tracks will be missing a variety of metadata.
Subsequently, you can sync via USB or Wi-Fi. Updating the library (vs. initial sync) is much faster so doesn't need to be done with the SD card in the windows machine card slot.
Finally, after you've attempted this numerous times over several weeks, you will realize that this process is a joke and doesn't work. Move on.
Syncing Q&A
- Why are there multiple profiles for the same device?
If you use both Wi-Fi and usb syncing with the same device (e.g. to do big syncs over the cable and small daily syncs over wifi), you should first set up your device for USB syncing first (making sure to check the "Grant remote sync/access rights" box for the profile. Otherwise, if you set up Wi-Fi syncing first, it may result in the creation of 2 different sync profiles (one for Wi-Fi the other for USB)! - How to configure wi-fi sync to convert audio formats (e.g. flac to mp3)?
Conversion rules (and some other more advanced sync settings) are configured in the Device Profile in MediaMonkey for Windows. - What does bi-di synchronization do?
It causes tracks from defined directories on the device to be kept synchronized with MMW. Metadata and playcounts for any track on either sync list are synchronized regardless of whether this is enabled. - Does it matter whether I configure my device for USB or MTP mode?
It's irrevelant to Wi-Fi synchronization, but still relevant to wired (USB) synchronization (metadata can be synced over MTP even if the destination device isn't running MMA). - Can I initiate a USB sync from the Android device?
No. - How can I limit the number of playlists that can be browsed by MMA?
By limiting the number of playlists shared via the UPnP/DLNA server, it becomes easier to browse which content to auto-sync. Note that even if playlists aren't browseable in the Wi-Fi Sync configuration screen, they can still be configured to sync by selecting them in MMW. Once those have been synced, the playlists will appear in the MMA options; you can then deselect them from MMA. - Why is content resyncing every time I sync?
Auto-playlists will sync whatever content has changed each time. A randomly-generated autoplaylist will replace all the previous entries with a new set of random entries with each sync. - Why are files deleted in MMW not being deleted from my device?
If you deleted files from your MMW Library you'll need to set it to delete all media files in the Device Profile (Tools > Options > Portable Device Sync in MMW).
- How do these instructions differ for MM5?
- How do you copy/sync selected songs (from specific albums, playlists, etc.) using each of the above methods? How is this done in each of the versions of MM?
Troubleshoot Syncing problems
See the MediaMonkey Knowledge base.