Editing Artwork
Wiki Home > MediaMonkey 5 Help > Editing Files > Editing Artwork
Artwork can be edited in a few different ways: via the Preview window, via the Properties dialog's Artwork tab, or via the Auto-Tag function. In all 3 cases, it is possible to save Artwork directly to the tag or to save Artwork files to a specified directory.
Artwork Settings
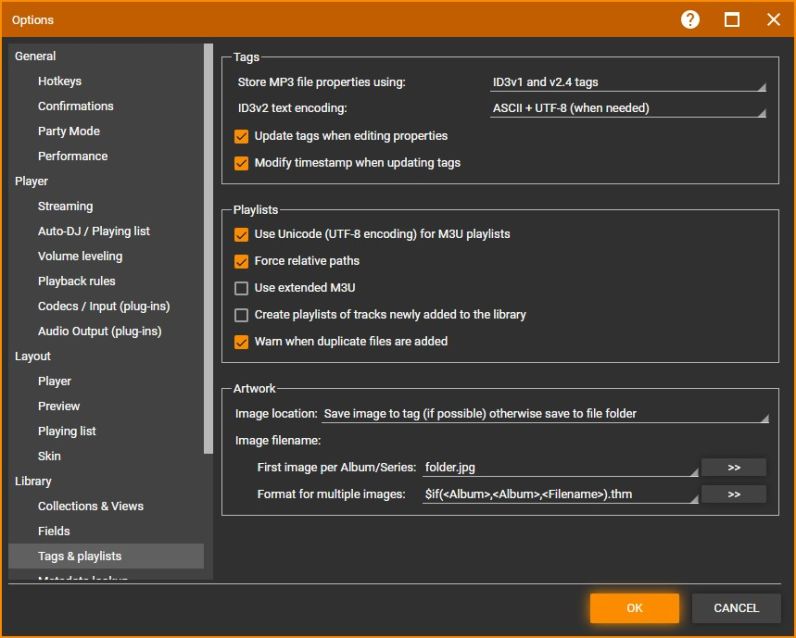
Under Tools > Options > Tags & Playlists you can configure how MediaMonkey saves Artwork for your Media Files.

- Image Location allows you to set if Artwork should be saved to the files tags, to a folder as an image file or both.
- Image to tag will embed the Artwork file into each media file it is associated with. The big benefit is that Artwork will always stay with the media file, no matter where you copy, move, rename or sync the media file. This method does require a bit more disc space as each media file associated with the Artwork will have a copy of it. This method only works for File Types that support this. If a File Types doesn't support the Artwork will be saved as an image file instead.
- Save to file folder will save the Artwork as an image file. This method requires a good organization of media files, so that the Artwork file is saved in the same folder as the media files it is associated with and that no other media files are in the same folder. You may get the Artwork associated with all media files in that folder on scanning (disable Scan file directories for Artwork under Tools > Options > Library from the Main Menu to prevent this).
- First Image per Album/Series is the filename to be used for the first Artwork you associate with the media file(s).
- Format for multiple images is used when associating any additional Artworks with the media file(s).
Using External Album Artwork Files
If you have external Artwork files you can have MediaMonkey associate them with your files on scanning. Under Tools > Options > Library from the Main Menu enable the option to Scan file directories for Artwork. When enabling this option make sure that you organize your media files and Artwork files together in a separate folder per Album/Series/Movie for the best results. Proper Album and Album Artist tags are also important when having external Artwork automatically associated with your media files.
If you choose to store Artwork outside of the Album/Series/Movie folder (like all Album Artworks in a single folder) there is no method to automatically import this into MediaMonkey. You can manually associate the correct Artwork with the correct Album, but MediaMonkey can't automatically associate the correct Artwork with the correct Album/Series/Movie.
This is why the recommended organization when using external Artwork is to have the Album/Series/Movie media files and their associated Artworks in the same folder with no other Album/Series/Movie files in that folder. Then Scanning can automatically associate Artworks with their respective media files when Scan file directories for Artwork is enabled.
Note that some other software (Windows Media Player/Windows are known for this) can create multiples Album Artwork files per Album which would all be automatically associated with your files in MediaMonkey if you enable MediaMonkey to scan for external Artwork.
Automatically Looking up Artwork
You can enable Artwork under Tools > Options > Metadata lookup from the Main Menu and MediaMonkey will try to automatically lookup Artwork when the file is played. MediaMonkey Gold users can have the Artworks automatically saved to the tags by enabling Update tags.
Edit Artwork via the Properties Dialog
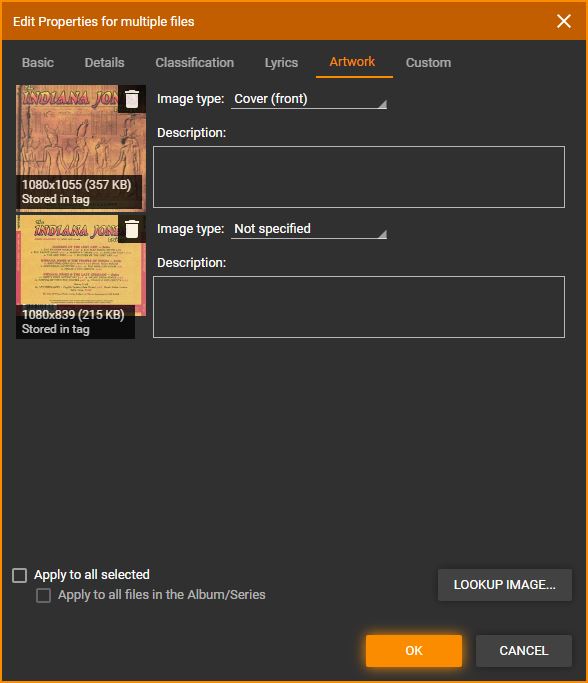
To edit multiple Artworks, use Edit > Properties from the Main Menu on selected media files you want to edit, and select the Artwork tab in the Properties Dialog. All Artworks that are associated with the selected files(s) will appear.

- You can Drag & Drop the Artworks shown to re-arrange the order. MediaMonkey will use the first listed Artwork to display in MediaMonkey.
- You can delete any Artworks associated with the media files using Remove from the right click Context menu on the Artwork.
- Each Artwork shows the dimensions, size and where it is saved. When Artwork is embedded it will show as Stored in tag.
- You can set what Image type the Artwork is considered to be and add a description of the Artwork.
- You can Drag & Drop Artwork files from outside of MediaMonkey onto the Artwork area in the Artwork tab to add the Artwork to the selected media files.
- You can do an online lookup of Artwork using the Lookup image button if the selected files are from the same Album/Series/Movie. Click on the YYYxYYY size information to see an enlarged version of the found Artwork. Select a found Artwork and click OK to associate it with the selected media files.
- You can manually add files from your PC by using the Lookup image button and then the Browse button on the Image search dialog.
- If multiple files are selected you can select Apply to all selected to have all displayed Artworks saved to all selected media files. Use this with caution when editing multiple files not from the same Album/Series.
- If you're editing a sub-set of files from an Album/Series you can select Apply to all files in the Album/Series to have all displayed Artworks saved to all the files on the Album/Series even when they weren't selected for editing. Use this with caution when editing files that aren't properly tagged with Album/Album Artist or Series.
Any changes to the media files will be made only after clicking OK on the Properties dialog.
Unsaved Artwork
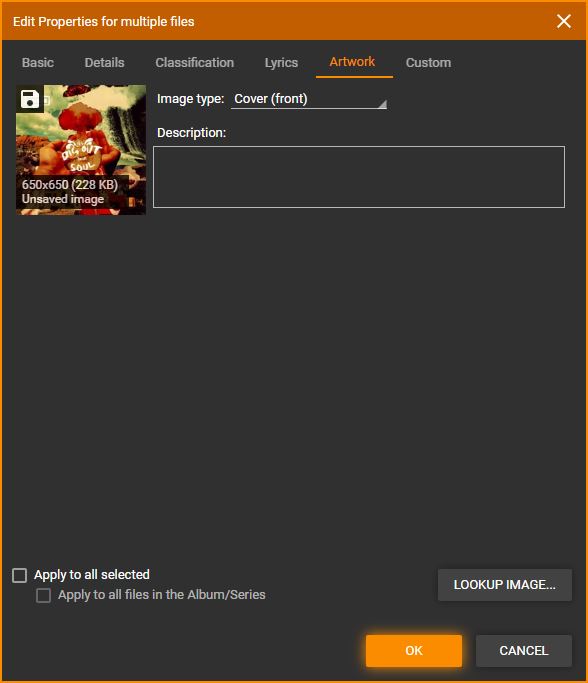
When MediaMonkey uses auto-lookup for Artwork it will show this Artwork in the Properties > Artwork tab. This Artwork isn't yet saved to the file.

- If you want to associated the Artwork use the Save Icon on it and the Artwork will be saved according to your settings.
- If you associate any other Artwork the auto-lookup Artwork will be removed (so save it first if you want to keep it, use Lookup Image to find it again).
Edit Artwork via the Preview Window
The Preview window allows you to quickly Add/Remove/Edit Artwork a single Artwork at a time, for the Selected file or Playing file (depends what the Preview window is set to). With it, you can quickly:
- Copy and Paste or Drag & Drop an Artwork file from anywhere on your PC onto the Preview Window.
- Right-click on the Artwork and use Lookup image from the Context Menu to add a new Artwork file.
- Right-click on the Artwork and use Remove image from the Context Menu to remove the Artwork that appears.
- Right-click on the Artwork and use Properties from the Context Menu to access the Properties > Artwork tab (for instruction on use see above).
- Right-click on the Artwork and use Images from the Context Menu to choose which associated Artwork the Preview window will display.
Related Information:
| English |
Additional Help: Knowledge Base | Forum | MediaMonkey Support | MediaMonkey for Android Help | MediaMonkey 5 Help | MediaMonkey 4 Help