Using AutoPlaylists
Wiki Home > MediaMonkey 5 Help > Playing Media Files > Playlists
Introduction
Unlike regular Playlists, which are a collection of files, AutoPlaylists are Criteria based. Any files matching the Criteria set for an AutoPlaylists will be shown on the AutoPlaylist. This means that when you add new files to the Library, edit Tags on files in the Library or remove files from the Library that the AutoPlaylist will automatically reflect those changes and include any new files matching the Criteria and remove any files no longer matching the Criteria automatically.
For example AutoPlaylists allow you to quickly create an AutoPlaylist of 5 star Rock music that aren't Christmas songs, using Criteria like Rating and Genre.
As AutoPlaylists are Criteria based you can't add/remove individual files from the AutoPlaylist or manually change the sort of individual files on the AutoPlaylists. If you want that you could save the files to a regular Playlists which does allow for this, but it won't be automatically updated by changes in your MediaMonkey Library.
NOTE: AutoPlaylists are stored in the MediaMonkey database. Losing the database means the AutoPlaylists are lost too. Removing files from MediaMonkey means they're also removed from the AutoPlaylists in MediaMonkey, but when the files are re-added to the Library they'll also be re-added to any AutoPlaylists for which the Criteria match. You can move your library to a new PC to move your Playlists to a new computer.
Create an AutoPlaylist
- Use Edit > New AutoPlaylist from the Main Menu.
- A new AutoPlaylist will be created in the Playlists node in the Media Tree.
Edit an AutoPlaylist

- Right click on the AutoPlaylist in the Playlists node in the Media Tree and select Edit from the Context menu.
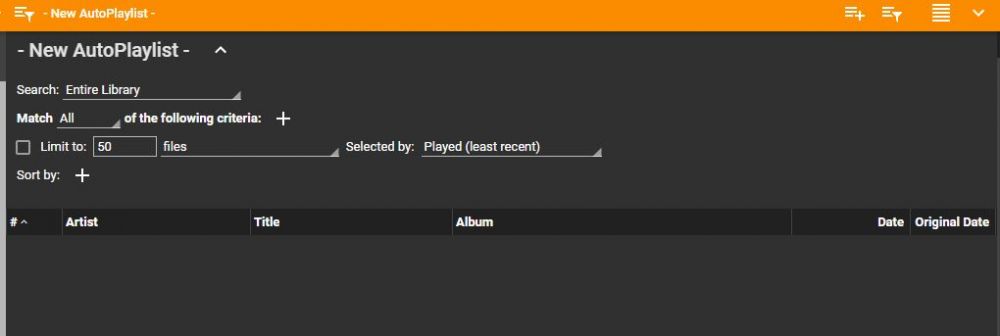
- In the Filelisting you'll see the settings for the AutoPlaylist in the Info Panel. You can set the following settings for an AutoPlaylist:
- You can change the AutoPlaylist name using double click on the AutoPlaylist name in the Filelisting.
- You can set to which Collection the AutoPlaylist should be limited using the Search setting. When setting it to a Collection only files in that Collection will be included in the AutoPlaylist.
- You can set if All or Any of the Criteria should be matched using Match. When setting the Criteria Genre = Rock and Date = 2008 you'd get all Rock files from 2008 with match All (but not Rock files from other years or other Genres from the year 2008). With match Any you'd get all files with Genre Rock and all files from 2008 (so for example Rock songs from 2007 and Pop songs from 2008 will be included).
- You can set which Criteria to use to filter which files should be on the AutoPlaylist using the Match + button to add Criteria. You can use most tags from your files as Criteria and you can nest Criteria using [Nested condition].
- You can limit how many files should be shown on the AutoPlaylist by limiting by files, megabytes or minutes using Limit to. Limiting is useful when you have a large Library, but want to sync a limited subset. Selected by determines how this limit is applied. If you want a random AutoPlaylist to execute each time you use/view it you need to set Selected by to an (auto-refresh) option.
- You can set how the files on the AutoPlaylist are sorted using Sort by. You can use multiple sorts so you can for example first sort on Genre and then within the Genre sort on Artist. Sort can be applied descending and ascending
Related
- Adding Existing Media Files to the Library
- Media Tree: Playlists
- Using Playlists
- Exporting Playlists
- Sync Files to Devices
| English |
Additional Help: Knowledge Base | Forum | MediaMonkey Support | MediaMonkey for Android Help | MediaMonkey 5 Help | MediaMonkey 4 Help